Living Liquid
This is a modified version of the original Separations Living Liquid strat.
Notable changes are:
- The MT Provokes the Liquid Hand and invulns the first set of Fluid Swings and the Protean Wave from the “north” puddle.
- The first set of Protean Waves are baited by the MT and both healers, instead of both healers and D3.
- The DPS positions for the final set of Protean Waves are different.
[Click to Expand] Liquid Hand mechanics
The Liquid Hand is an add that spawns when Living Liquid casts the first Cascade in the fight. It has two key mechanics:
Hand of Parting
- The Liquid Hand will glow blue and turn into an open palm, or a closed fist.
- After a few seconds, the Liquid Hand will slam on the ground, dealing raid-wide damage based on its distance to Living Liquid:
- If the Hand was an open palm: Stack the Hand on top of Living Liquid.
- If the Hand was a closed fist: Separate the Hand and Living Liquid.
- Whether the Hand turns into a closed fist or an open palm can be baited.
- If Living Liquid and the Hand are separated, the Hand will glow with an open palm.
- If Living Liquid and the Hand are near one another, the Hand will glow with a closed fist.
- We will always want the Liquid Hand to turn to an open palm.
Hand of Pain
The Liquid Hand will slam the ground, and deal raid-wide damage based on the HP% difference between Living Liquid and the Liquid Hand.
- Living Liquid and the Liquid Hand's HP% must be within 5% to not deal lethal damage.
- This damage ignores tank invulnerability.
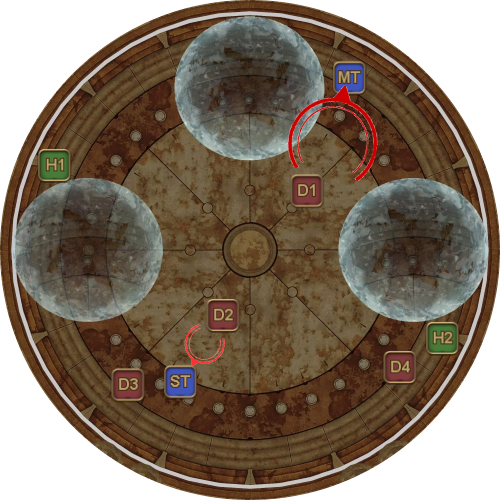
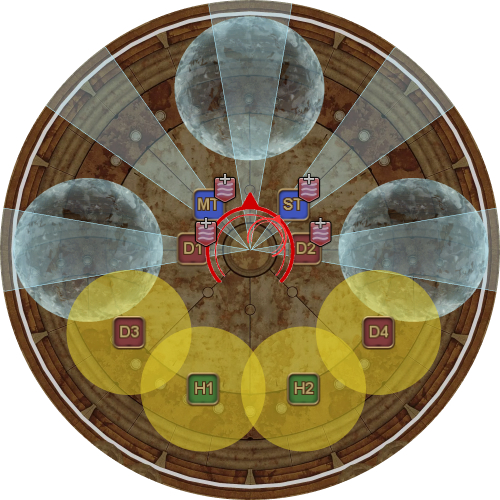
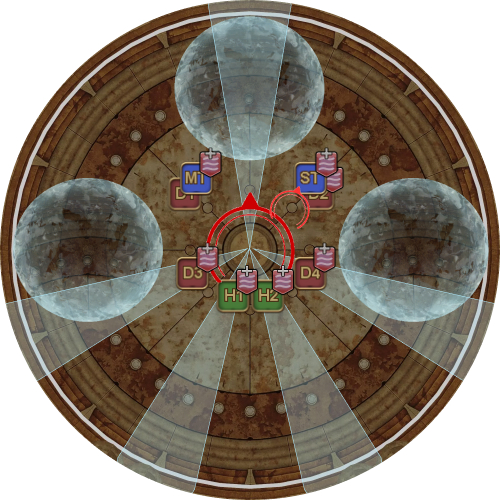
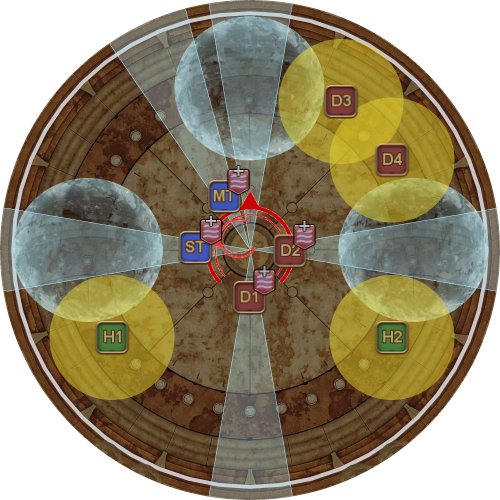
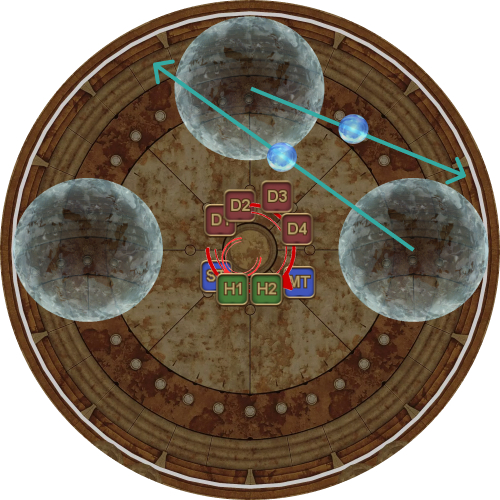
| 1. Pull Living Liquid to the center of the arena. Living Liquid will auto-attack three times, before cleaving the MT with a Fluid Swing. Living Liquid then casts the first Cascade, which spawns the Liquid Hand and three water puddles.
Tip: If the ST is having trouble taking the Liquid Hand's hate from the MT, the MT can momentarily turn off their tank stance when the Liquid Hand spawns to let the ST secure hate. As a rough guide, we split the party as such:
|  |
| 2. If Liquid Hand has been sufficiently separated from Living Liquid, it will now glow as an open palm.
| 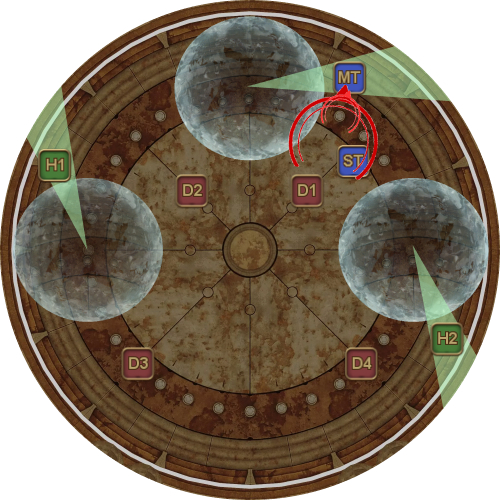 |
The Liquid Hand does not need to be defeated to clear the phase- however, its HP needs to be kept close to Living Liquid’s because of Hand of Pain.
Jagd Dolls
This is the first major section of the fight that introduces the Jagd Dolls, which are a one-time mechanic, but also introduces the puddle’s Protean Waves.
[Click to Expand] Jagd Dolls breakdown
The Jagd Dolls are adds that have the following mechanics:
- The Jagd Dolls tether to the first player that performs any action on them (including auto-attacks), and lock onto that player.
- They periodically pulse with Exhaust, a point-blank AoE that applies a stacking Luminous Aetheroplasm on any player hit.
- If any player is hit with two AoEs, they explode and wipe the raid.
- The Jagd Dolls cannot be destroyed by damage- they will explode and wipe the raid if they reach 0% HP.
- To destroy them, they need to be dragged near either Living Liquid or the Liquid Hand. Doing so will tether them to the boss and destroy them, dealing raid-wide damage to the party (Reducible Complexity) based on its current HP.
- The Jagd Doll must be under 25% HP, or the explosion will deal lethal damage.
[Click to Expand] Puddle's Protean Waves
- Each puddle targets the closest player to them with a cone telegraph.
- When the telegraph disappears, a cone Protean Wave fires where the telegraph was. This Protean Wave will also knockback any players hit (although this can be stopped with Arm's Length/Surecast).
- Finally, a second untelegraphed Protean Wave fires at the closest player. This Protean Wave cannot be avoided, but doesn't knockback.
All Protean Waves also apply a 5-second Water Resistance Down II debuff on the players they hit (so a player cannot get hit by more than one).
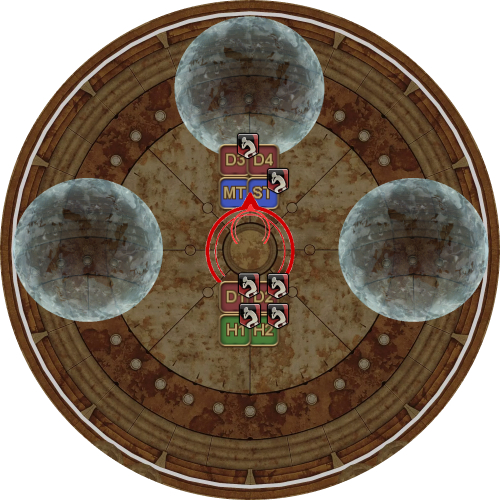
| 3. Jagd Dolls spawn, and first set of untelegraphed Protean Waves resolve.
The Liquid Hand will also use Hand of Parting here. The Hand should've been an open palm, which will wipe the raid unless the Liquid Hand is stacked on top of Living Liquid. | 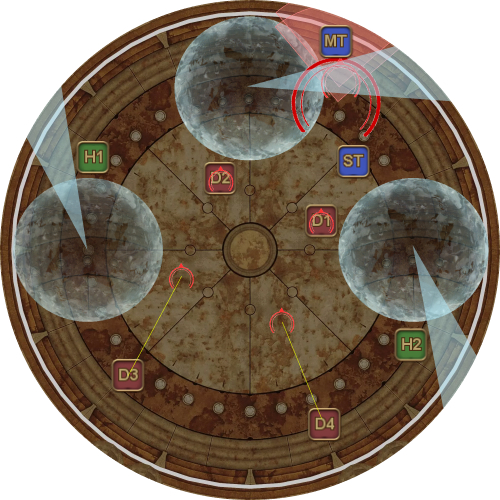 |
| 4. The second set of untelegraphed Protean Waves resolve.
The Liquid Hand will also use Hand of Pain here. Living Liquid and the Liquid Hand's HP need to be kept within 5% HP of each another for the party to survive this. | 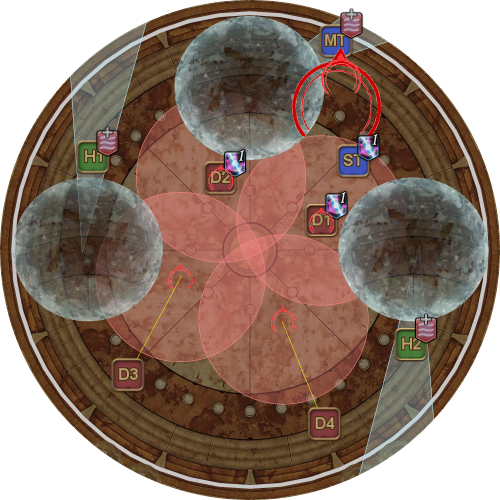 |
| 5. Liquid Hand casts Hand of Pain; two Embolus orbs spawn and slowly move towards the bosses.
|  |
| 6. D3's and D4's Dolls pulse one more time.
|  |
| 7. Living Liquid and the Liquid Hand both cleave their respective tanks with Fluid Swing/Strike.
|  |
Protean Waves #1
This section of the fight now introduces Living Liquid’s Protean Waves, which are similar to the puddle’s Protean Waves, with a few differences.
[Click to Expand] Living Liquid's Protean Waves
- Living Liquid targets each player with a cone telegraph.
- When the telegraphs disappear, a cone Protean Wave fires where the telegraph was. This Protean Wave will also knockback any players hit (although this can be stopped with Arm's Length/Surecast).
Living Liquid then fires two sets of five untelegraphed Protean Waves, one after the other:
- The four closest players to Living Liquid.
- A fifth Protean Wave in front of Living Liquid, in the direction Living Liquid is facing.
This last sets of Protean Waves cannot be avoided, but do not knockback.
All Protean Waves also apply a 5-second Water Resistance Down II debuff on the players they hit (so a player cannot get hit by more than one).
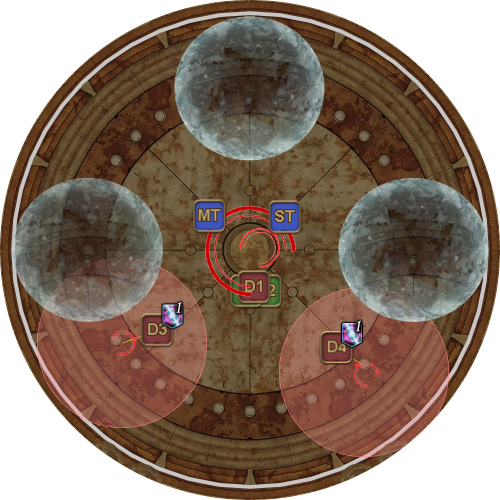
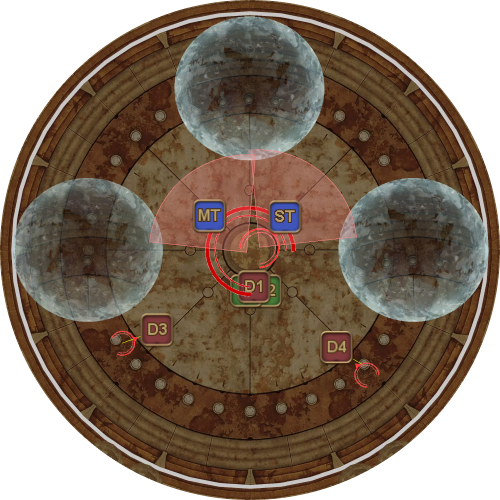
| 8. Party stacks "north/south" to bait the first set of telegraphed Protean Waves from Living Liquid. |  |
| 9. First set of untelegraphed Protean Waves.
|  |
| 10. Second set of untelegraphed Protean Waves.
|  |
| 11. 6x Splashes from Living Liquid. Two tornados will also tether to two players, and these tethers should be picked up by the tanks. They will resolve with an AoE tankbuster centered on the tethered player. It's easy for the Liquid Hand to be out of melee range, because the melee do not want to get hit by the tether AoEs. Healers and ranged can swap over to the Liquid Hand if needed to keep the HP within range for Hand of Pain. | 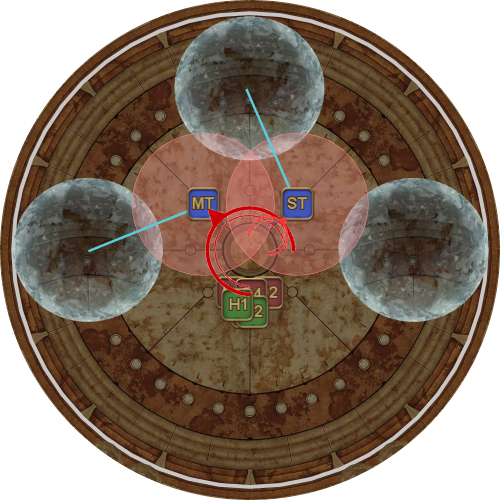 |
Protean Waves #2
This is the final phase of Living Liquid, and combines both Living Liquid’s Protean Waves with a set of Protean Waves from the puddles.
| 12. 2nd Cascade. The Liquid Hand also uses Hand of Pain. The party should reorient themselves to the new water puddles.
Six players (at random) will get a Throttle debuff, which must be removed via Esuna (or Warden's Paean).
How the two healers split up the Esunas doesn't matter, so long as they agree. We go with the following priority:
|  |
| 13. Start of Protean Waves #2. Just like the first iteration, this begins with baited, telegraphed Protean Waves north and south of Living Liquid. Tip: If both Living Liquid and the Liquid Hand are around 10-11% HP at this point, the whole party can switch to Living Liquid and kill it before the next Hand of Pain resolves. | 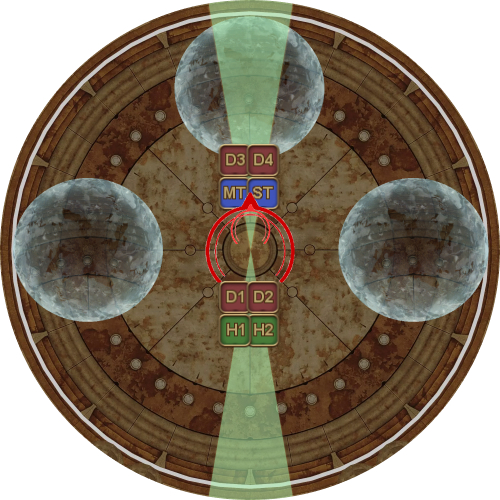 |
| 14. 1st untelegraphed Protean Waves from Living Liquid. The Liquid Hand will also do a Hand of Pain here.
|  |
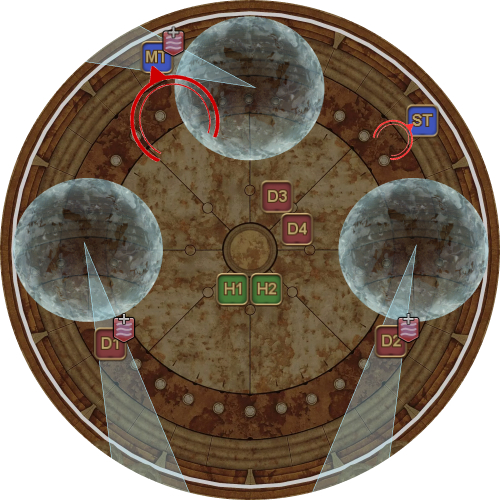
| 15. 1st telegraphed Protean Waves from the puddles.
(The East puddle's Protean Wave can be baited by either H2 or D4.) | 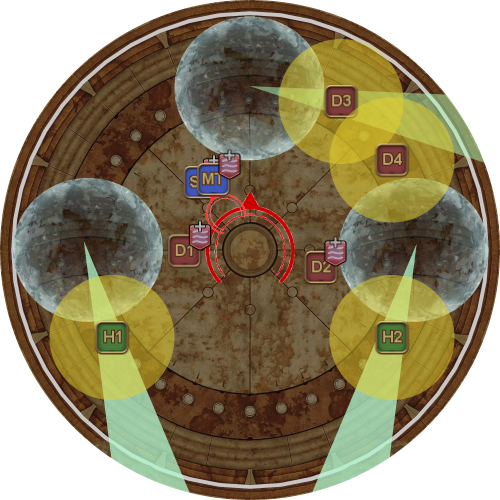 |
| 16. 2nd untelegraphed Protean Waves from Living Liquid. | 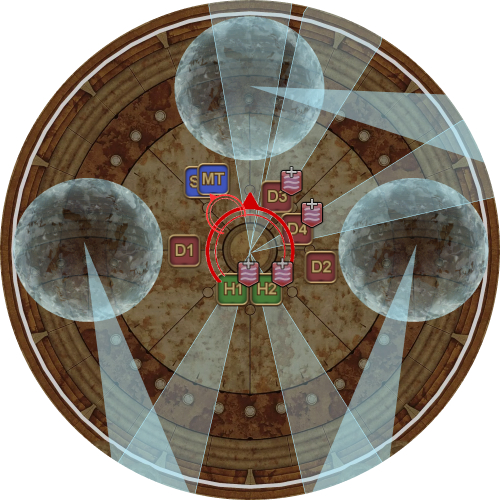 |
| 17. 2nd untelegraphed Protean Waves from the puddles.
|  |
| 18. Embolus orbs spawn.
|  |
| 19. The Liquid Hand does one final Hand of Pain. If the party went "all in" on Living Liquid, you need to kill Living Liquid before this Hand of Pain resolves. After the Hand of Pain, Living Liquid uses Splash six times before targeting the MT with Fluid Swing. Living Liquid then casts one final Cascade, serving as the enrage. | 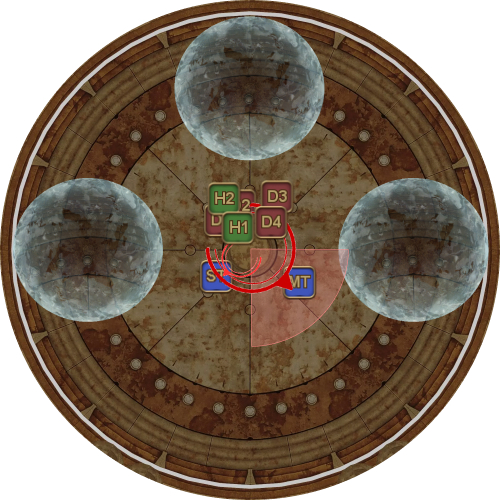 |
Troubleshooting
[Hand of Pain] The MT invulns the first Fluid Swing/Strike and the Protean Wave from the puddle, but dies shortly thereafter. What happened?
| The MT possibly died to Hand of Pain, which shortly follows the Protean Wave. Hand of Pain ignores tank invulnerabilities. |