Gaia and Shiva(2体フェーズ)
Mana PF follows Nukemaru’s strat for this phase onwards.
The Usurper of Frost will respawn at either North or South, whichever is further from where The Oracle of Darkness was defeated.
Make sure the two tanks have first and second aggro on the Usurper of Frost- her auto-attacks hit the top two players in aggro.
Fragment of Fate
The Usurper of Frost casts Materialization, which spawns the Fragment of Fate North.
Over the course of the phase, the Fragment of Fate will take damage. Assuming no player hits it with an AoE, it will survive with barely any HP.
This means that if it takes any extra damage (from an enemy AoE that targets a player), the phase becomes impossible to clear (although you’ll still be able to get practice in.)
| 1. Stack on the two intercardinal markers where the Usurper of Frost spawned. | 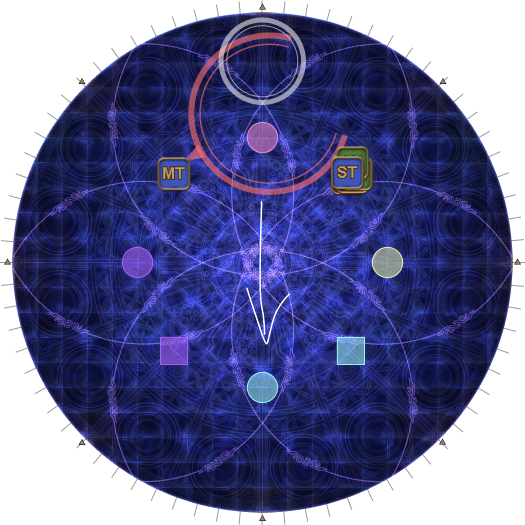 |
| 2. The Usurper of Frost will transform into its dragon form ("Come to me, Hraesvelgr!"). When the boss transforms, it will bait Akh Rhai AoEs where each player was standing. Simply move away when the boss transforms. | 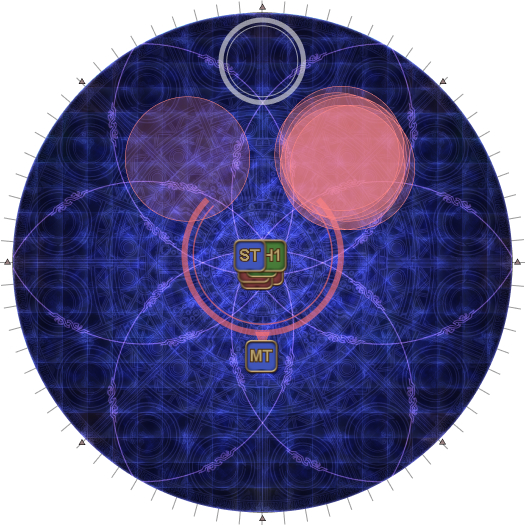 |
The Oracle of Darkness then respawns (everyone should swap over to target her), and should be taken by the ST.
They will shortly begin their first joint mechanic.
Darklit Dragonsong(光と闇の竜詩)
Both bosses will cast Darklit Dragonsong.
- The Usurper of Frost will deal raidwide damage.
- The Oracle of Darkness will apply tethers and Dark Water III debuffs on the party.
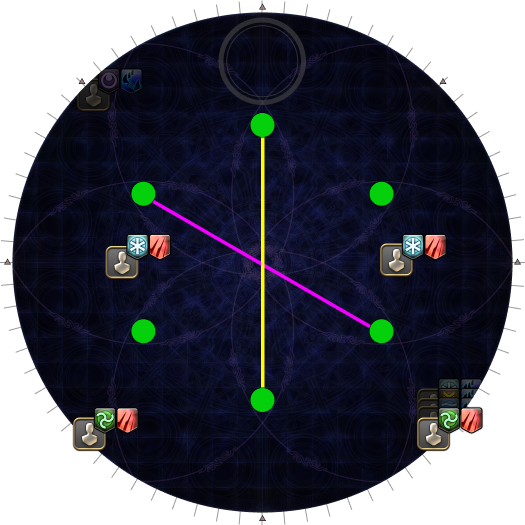
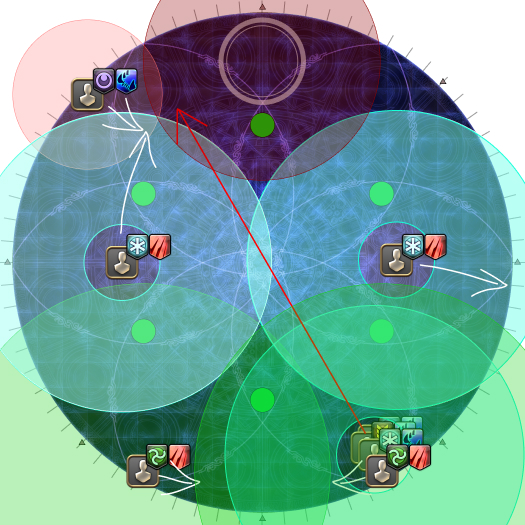
| 4. Line up with healers and tanks along the North, and DPS along the South. Two sets of debuffs come out:
One player will have both tethers and Water. | 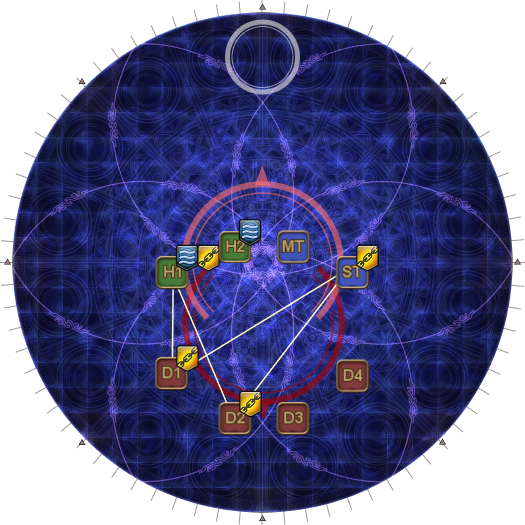 |
To resolve the tethers, we have to make a “bowtie” shape- this is the same as how Light Rampant was solved in Eden’s Verse- Refulgence.
To summarise, the tethered healer will always go North. For everybody else:
- If you are tethered to a healer: Go south.
- If you are tethered, but not to a healer: Go north.
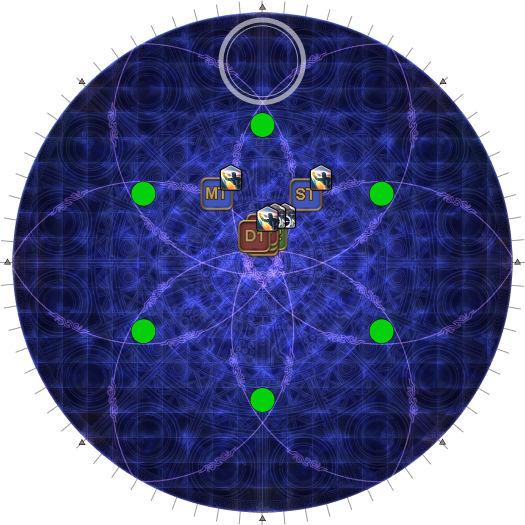
| 5. This is the best case scenario, where the tethers already make a bowtie. No adjustments are needed- the north-most tether players go to the North tower, and the south-most tether players go to the South tower. | 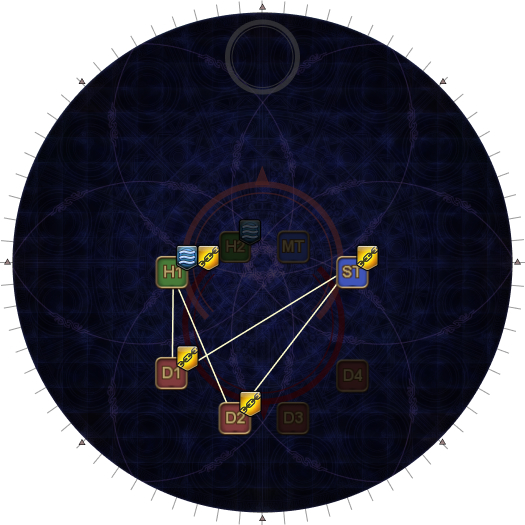 |
| If the tethers make a box, then the tank and the east-most tethered DPS swap positions. | 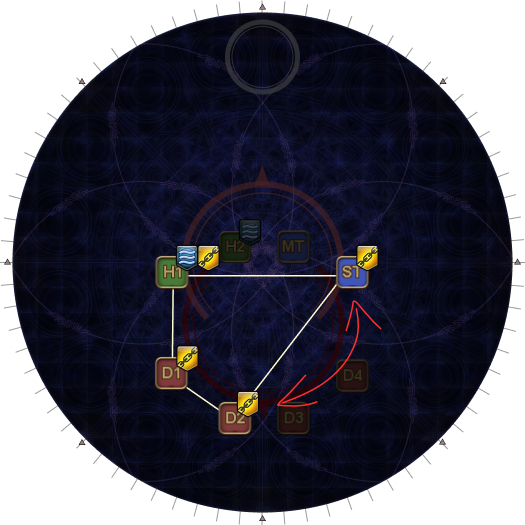 |
| If the tethers make an hourglass, then the tank and the west-most tethered DPS swap positions. | 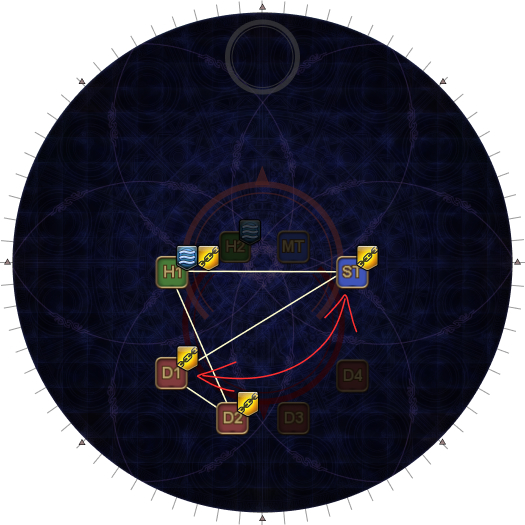 |
| 6. With the tethers sorted out, all players take up this formation with the non-tethered players between the two towers. There is a chance that both tethers started on the same East/West side of the boss. If so, D2 and D3 swap sides. (In the example, the tethers are on D1+D2, so D2 goes to the East, and D3 goes to the West.) | 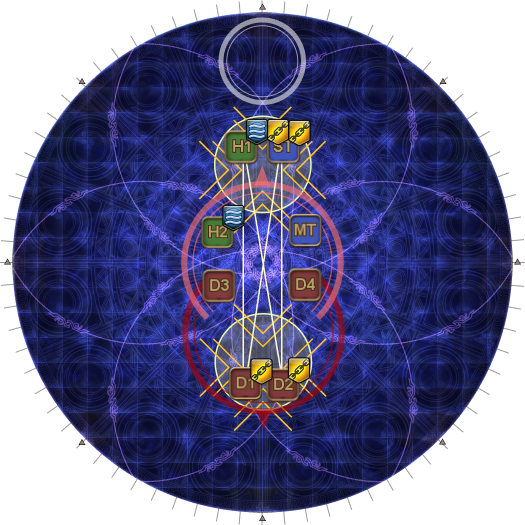 |
With the tethers sorted out, the next thing we need to do is separate the two Dark Water III debuffs.
| 7. If the two Dark Water III debuffs are on different sides (North vs. South), then no further adjustments need to be made. If the Dark Water III debuffs are either both North, or both South, then the Water player and their partner swap sides. Do this before the towers resolve. (In this example, since both Water debuffs are in the North group, the non-tether Water (H2) and their partner (D3) switch places.) |  |
We can now continue with the mechanic.
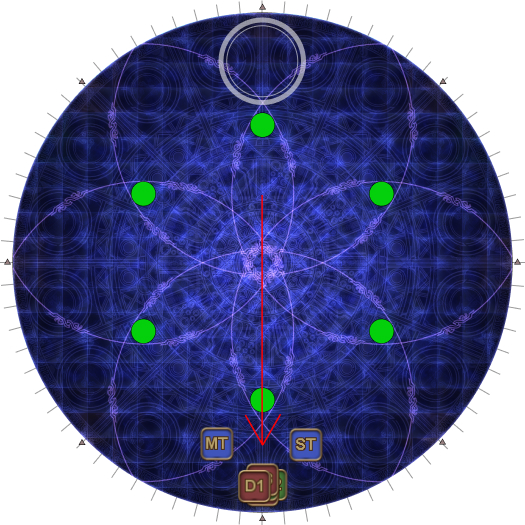
| 8. The tethered players take the two towers, while the Usurper of Frost readies The Path of Light, which cleaves the four closest players- these should be the four non-tethered players. | 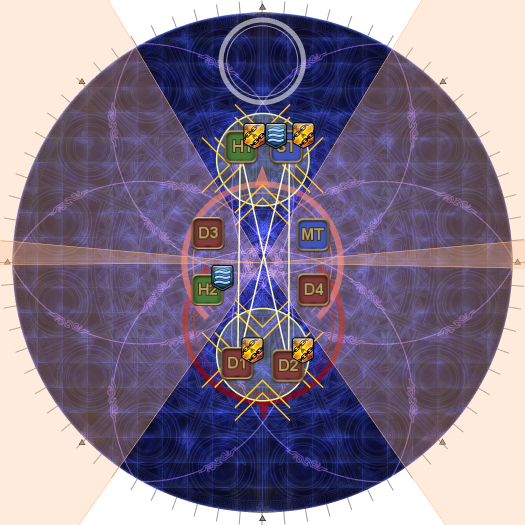 |
| 9. Move a little bit south, and spread out around both bosses. Do not spread too close to the Fragment of Fate! (the danger zone is marked in dark red.) | 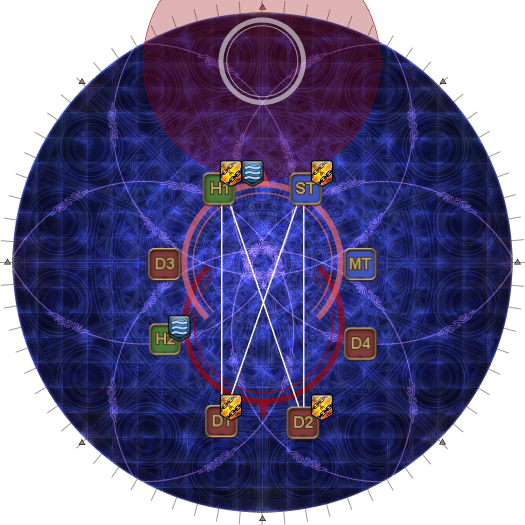 |
| 10. The Oracle of Darkness targets a random player for Spirit Taker. Ideally, she should not move much. | 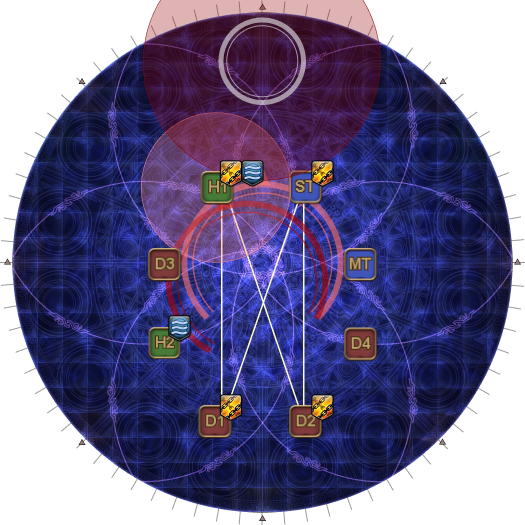 |
| 11. The Usurper of Frost will then use Hallowed Wings, which will cleave either the West or East half of the arena. The Water III debuffs will also resolve roughly at the same time, so stack up on the two intercardinal markers on the safe half of the arena.
| 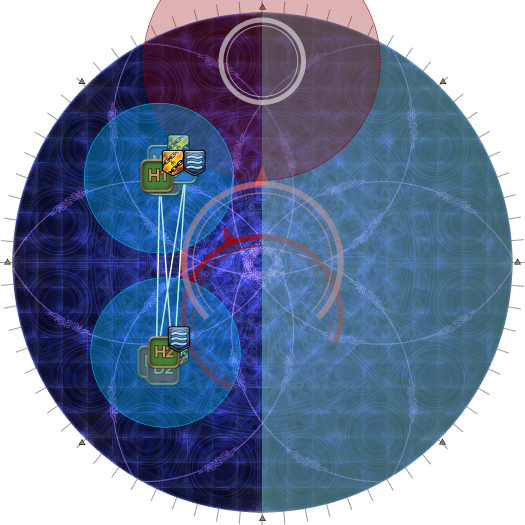 |
| 12. The Oracle of Darkness targets the furthest player for Somber Dance (宵闇の舞踏技). This is actually a two-hit tankbuster, first targeting the furthest player, then targeting the closest player. However, unlike the Savage version, both hits can be taken by the same player, which we do with tank invulnerability. Some notes though:
|  |
Akh Morn 1 - 7:1 (MT solo)
The two bosses will then teleport a bit West and East of the center for Akh Morn into Morn Afah, which is a party stack.
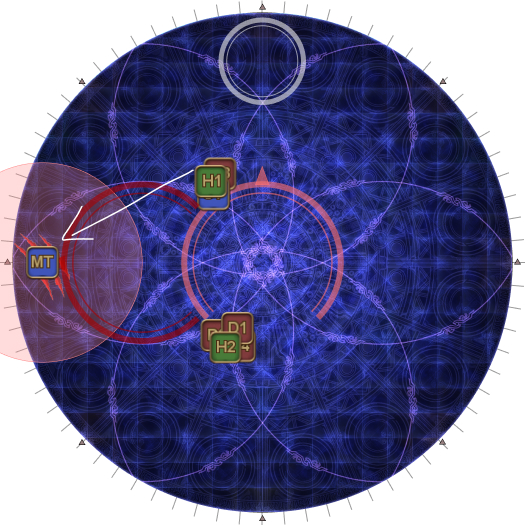
| 13. The two bosses target whoever has their hate with a 4-hit Akh Morn (which should be their respective tanks). However, a tank can mitigate this to lower the damage on the party- for this first Akh Morn, we have the MT split off.
| 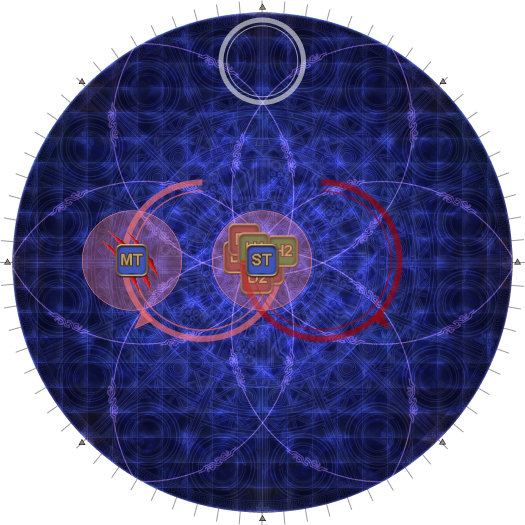 |
Morn Afah is also a boss HP check, and the two bosses must be within 5% HP of each other, or Morn Afah will be lethal. If they are not within 5% HP, the two bosses will tether together indicating which boss has too much HP.
- White tether: The Usurper of Frost has too much HP.
- Purple tether: The Oracle of Darkness has too much HP.
Tip: Morn Afah originates from the Usurper of Frost, not the Oracle of Darkness.
If the HP difference is too large (i.e: the bosses are tethered together), the MT (that's holding the Usurper of Frost) can sacrifice themselves to save the party from wiping to Morn Afah.
Crystallize Time(時間結晶)
The bosses will cast Crystallize Time. This is probably the hardest part of the encounter, so hang in there.
- Six hourglasses will spawn.
- The Usurper of Frost will apply a set of debuffs on the players to resolve.
- The Oracle of Darkness will deal raidwide damage and tether to four hourglasses.
- The North and South hourglasses with yellow tethers.
- Two of the remaining opposite hourglasses with purple tethers.
[Click to Expand] Crystallize Time debuffs
Two dragon heads spawn North, and circle the arena- one clockwise, one anti-clockwise.
 | Wyrmclaw Shredded by draconic talons. KO will occur when countdown reaches 0. Wyrmclaw and Wyrmfang randomly split the party into two groups of four. When a player with Wyrmclaw runs into the dragon head, it:
The dragon head will leave the arena after the second red Wyrmclaw is fed. If two red Wyrmclaw debuffs are not fed to the dragon head by the time it finishes its loop, it explodes and wipes the raid (Joyless Dragonsong). |
 | Wyrmfang Torn by draconic teeth. KO will occur when countdown reaches 0. Wyrmfang and Wyrmclaw randomly split the party into two groups of four.
|
With that out of the way, there are two more debuffs added in addition to all the previously encountered Spell-in-Waiting debuffs.
 | Spell-in-Waiting: Dark Aero III When the debuff expires, a large point-blank AoE centered on the player resolves. Any other player hit by this AoE gets knocked across the arena away from the Aero player. |
 | Spell-in-Waiting: Quietus Three players will have this debuff. Raid-wide damage goes off when this debuff expires (30s). |
| Four players will get the red Wyrmclaw debuff:
The Blizzard players will stand East and West, between the hourglasses:
The two Blizzard players should look to see if there is a player directly North of them. If there isn't anyone, that Blizzard player should stand a little North of the center (in-line with the top of the waymark), and prepare to Sprint. The Aero players will stand South-West and South-East, at the intercardinal mark:
|  |
| Four players will get the blue Wyrmfang debuff:
These players will need to eventually mark themselves 1-4. Identify the purple tether. Only the blue player with Dark Eruption goes to the North-side intercardinal mark with the purple tether. Everybody else joins the red Aero player at the South-side intercardinal mark with the purple tether. Keep the red Aero player as the closest player to the edge. (In this example, the purple tether stretches NW to SE, so the Dark Eruption player goes NW, and all other blue players move SE.) | 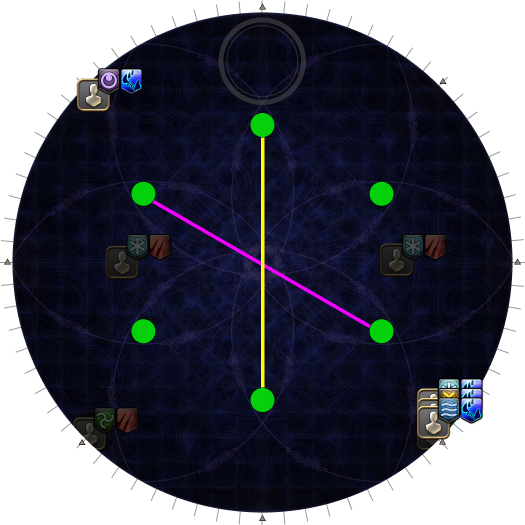 |
Once all players have taken up their initial positions, we can begin to resolve the sea of mechanics.
| 14. The yellow-tethered hourglasses (North and South) resolve. The two red Aeros, and all the south-side blue players move into the hourglass AoEs when they resolve (Maelstrom), and stand at the tip of the "flower petal" decal on the floor. The south-side blue players and the red Aero need to stack together closely, with the red Aero closest to the edge of the arena. | 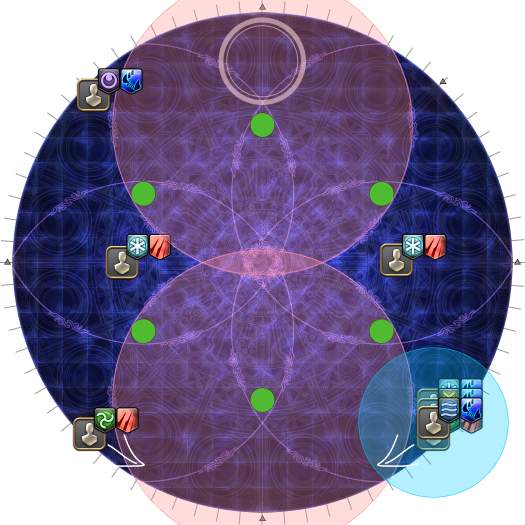 |
| 15. The dragon heads reach the E/W red Ice players around the same time the debuffs resolve, and explode in an AoE (Longing of the Lost).
|  |
| 16. The second set of hourglasses explode together with the blue player with Unholy Darkness.
The two red Aeros move SW and SE after the hourglasses explode to prepare to intercept the dragon heads. The red Ice player that was not in the stack crosses over the E/W flower petal to the North side after the hourglass explodes. | 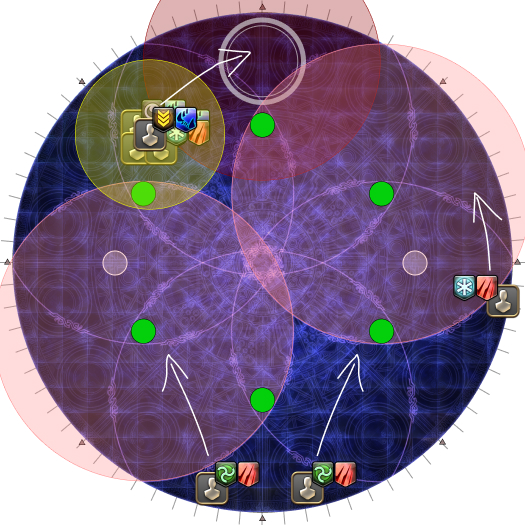 |
| 17. The red Aeros intercept the dragon heads. At this point, all the red Wyrmclaw debuffs have been resolved.
A travelling line telegraph (Tidal Light) appears either along the West or East side of the arena, where the lone red Ice player may be.
Note which side the telegraph started on (East or West). | 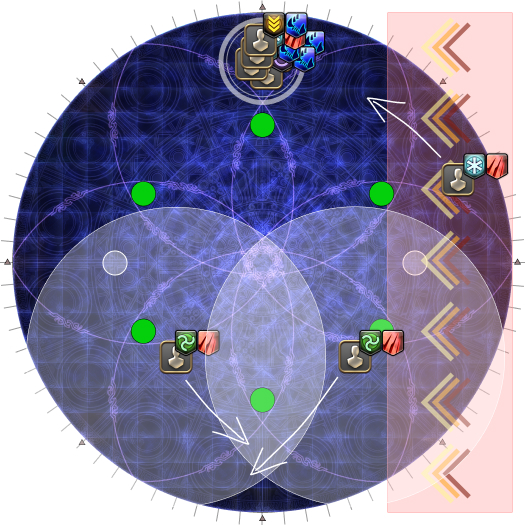 |
| 18. The third set of hourglasses resolve together with the first line AoE. Depending on where you are, position yourself to dodge into either the first or second line AoE (there will be telegraphs for both). The objective is to end up on the side where the line originated from. | 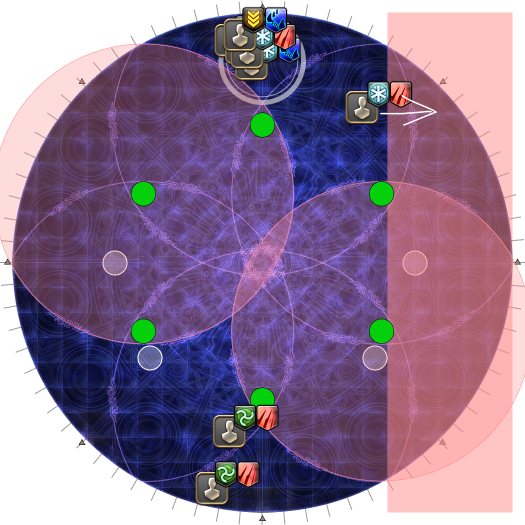 |
| 19. Now that all three pairs of hourglasses have resolved, the blue debuff players now go out to the puddles left behind to cleanse their debuff. Each blue player should have marked themselves 1-4 by this point. This is to assign players to puddles, with 1 taking the east-most puddle and 4 taking the west-most. | 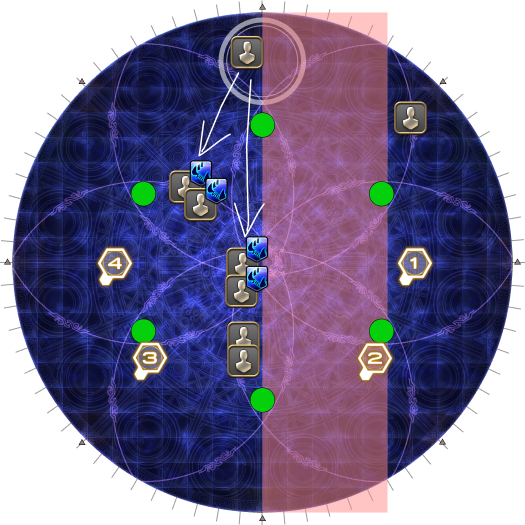 |
| 20. A second line telegraph now appears, this time either North or South. Note which side this telegraph starts on (North or South). The party will spread later with this side as relative North. Note that if this second line AoE starts North, the blue players need to quickly cleanse their debuffs to make it back in time. |  |
| 21. Position yourselves to dodge the second line AoE. At this point, all blue players should have cleansed their debuff. If the line AoE started North (like in this example), this is your last chance to get to the safe side in time. | 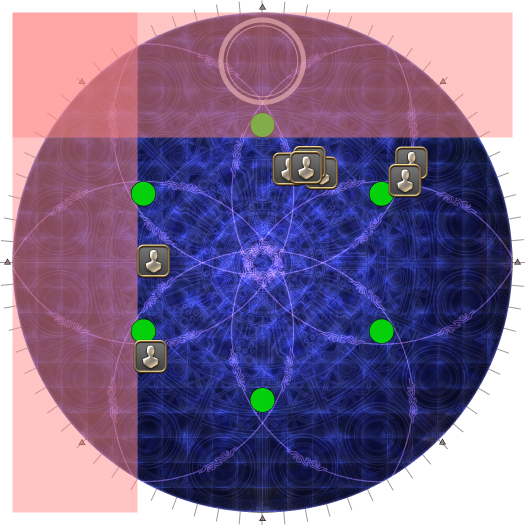 |
| 22. Dodge the second horizontal line AoE and move towards the center. The Quietus debuffs will resolve shortly, dealing raid-wide damage. | 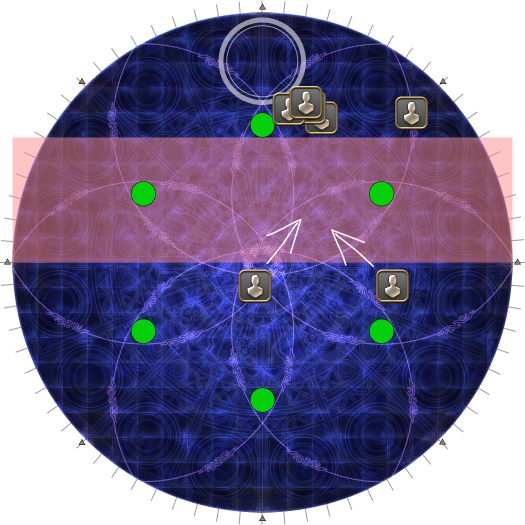 |
| 23. Make a Y-shaped formation near the center of the arena, towards where the second set of line AoEs originated from.
Everybody records their position in this formation. |  |
| 24. After recording your position, spread out for Spirit Taker on a random player. Using where the second line AoE originated from as north:
Do not be near the Fragment of Fate! The DPS will want to spread on the waymarks, which are:
| 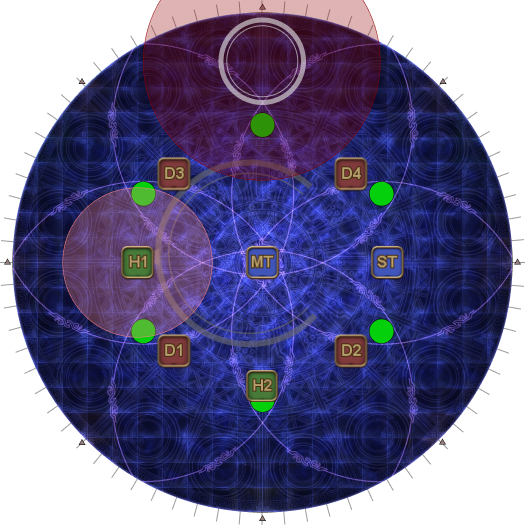 |
| 25. The Oracle of Darkness will jump on a random player with Spirit Taker. When she does so, prepare heavy mitigation:
|  |
| 26. The rewind resolves, and the Usurper of Frost casts Hallowed Wings from the side where the first line AoE came from.
|  |
| 27. The second Hallowed Wings resolves, this time from North or South (wherever the second line AoE came from). The party will get knocked back half the arena. | 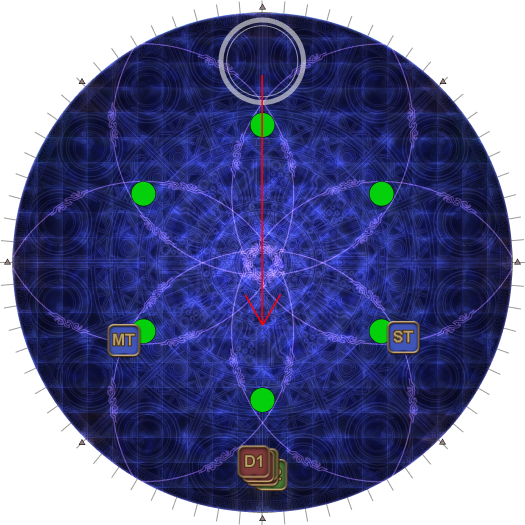 |
Akh Morn 2 - 7:1 (ST solo)
The two bosses will reappear around the center of the arena and immediately start another 4-hit Akh Morn into Morn Afah sequence.
| 27. The two bosses target whoever has their hate with a 4-hit Akh Morn (which should be their respective tanks). This time, we have the ST split off and take it solo. | 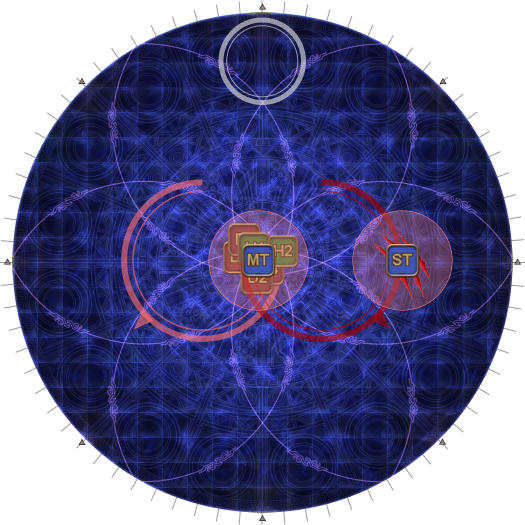 |
Notably, the Fragment of Fate will do one round of Edge of Oblivion just before the Morn Afah resolves, so any shields will need to be reapplied.
Also remember that two bosses have to be within 5% HP of each other for Morn Afah. If things are looking bad, Morn Afah comes from the Usurper of Frost, so the MT can sacrifice themselves and take it away from the party if needed.
Both bosses will then start casting their respective enrages (Absolute Zero and Memory’s End).
When both bosses are defeated, there will be a knockback from the center, and you will advance to the next arena.
If the Fragment of Fate is not around, Eden’s Promise will spawn and wipe the raid. If, on the other hand, the Fragment of Fate is still alive, then the party advances to the final phase.
Frequently Asked Questions
[Materialization] Does the Fragment of Fate still spawn if the Crystals of Darkness were destroyed earlier?
| Materialization will always spawn a Fragment of Fate, regardless of whether the Crystals of Darkness were destroyed. However, if the Crystals of Darkness are destroyed, the memory will be changed and the name of the raidwide that it periodically casts is named Depths of Oblivion instead of Edge of Oblivion. They both do the same amount of damage. |
[Darklit Dragonsong] Who should we debuff to reduce incoming damage?
| Although both bosses cast Darklit Dragonsong, damage originates from the Usurper of Frost. (You can think of it as the Oracle of Darkness is the one that applies all the debuffs on the party, although it's actually the environment that does so.) |
[Darklit Dragonsong] Are the tethers here different from Light Rampant?
| Yes, they are. The debuffs at Light Rampant were:
While the debuffs here are:
The important distinction is that while the Curse of Everlasting Light tethers break if they're too short, the Refulgent Fate tethers break if they're too short or too long. |
[Darklit Dragonsong] How close or far can you get before the tethers snap?
| The tethers break if they are shorter than around 8 yalms, or longer than around 26 yalms. |
[Akh Morn/Morn Afah] Do these ignore invulnerabilities?
| Yes, they do- in particular, they deal damage through all invulnerabilities, including tank invulns and the "raise" invuln. |
[Crystallize Time] Who should we debuff to reduce incoming damage?
| Although both bosses cast Crystallize Time, damage originates from the Oracle of Darkness. (You can think of it as the Usurper of Frost is the one that applies all the debuffs on the party, although it's actually the environment that does so.) |
[Crystallize Time] Why do the anti-knockback strat instead of just doing it normally?
| Using Arm's Length/Surecast to mitigate the knockback from the first Hallowed Wings allows the party to record their positions closer to the center. This accomplishes two things:
|
[Crystallize Time (Hallowed Wings)] Just how does this mechanic work?
| As mentioned, the first player hit takes the most damage, and that damage goes down the further down the line you go. More specifically, the base damage numbers are approximately:
In addition, the first four players hit also get a Magic Vulnerability Up debuff. This debuff increases the damage taken to 400%, which means that the fifth player hit with vuln (400% x ~40k damage) takes roughly the same damage as the first player without (~160k damage). Note that these are base values, so multiply them roughly by 0.64 for tanks, and 0.94 for casters/healers. (Thanks to syl for the analysis!) |
Troubleshooting
[Somber Dance] How did the WAR die? What went wrong with Holmgang?
| Holmgang has two modes- one that has a target, and one that does not.
This is especially a problem for WAR, because they need to bait Somber Dance far (i.e: further than 6.5 yalms), and are likely targeting something. The solution is to simply untarget before pressing Holmgang. |
[Crystallize Time] What is Joyless Dragonsong?
| This is a raid wipe and the failure condition for letting the dragon heads leave the arena (one of the red Wyrmclaw players did not cleanse their debuff). |
[Hallowed Wings] How did the melee miss party mitigation?
| They spread past the waymarks, which is too far relative-south and puts them out of range of the tanks' party mitigation (30 yalms). The waymarks are positioned such that standing on them will be far enough from the Fragment of Fate that Spirit Taker will miss, but not so far that D1/D2 misses the tank's party mitigation. |