Usurper of Frost(シヴァ・ミトロン)
The tank that opens this fight should be the tank that did not invuln the second Powder Mark Trail towards the end of P1 (which is usually the MT).
The boss opens the fight with Quadruple Slap on the tank. Despite the name, this is actually a “two-hit” tankbuster, but the first hit applies a Physical Vulnerability Up debuff that can be Esuna’ed.
Both hits can be invulned.
The boss will auto-attack twice after the tankbuster, and its damage is increased with the Physical Vulnerability Up debuff.
Either Esuna the Physical Vulnerability Up, mitigate through the two auto-attacks, or have the ST Provoke the boss to take the auto-attacks.
The boss then teleports slightly south of center and casts Mirror Image which summons an (untargetable) Oracle’s Reflection before casting Diamond Dust for heavy raid-wide damage.
Diamond Dust(ダイヤモンド・ダスト)
Diamond Dust resolves itself in a very similar way to Diamond Frost in Eden’s Verse: Refulgence (Savage).
| 1. Take up the spread positions from P1. Two tells begin at the same time:
(In this example, the circles spawn on cardinals.) | 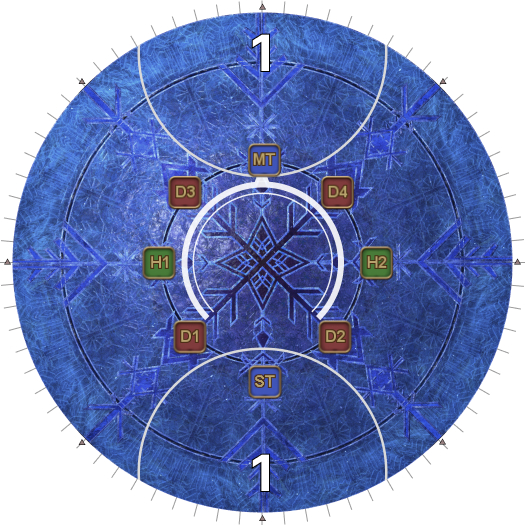 |
| 2. First, identify whether the boss is doing Axe Kick or Scythe Kick as the resulting AoE determines the usable space. | |
| Axe Kick | Scythe Kick |
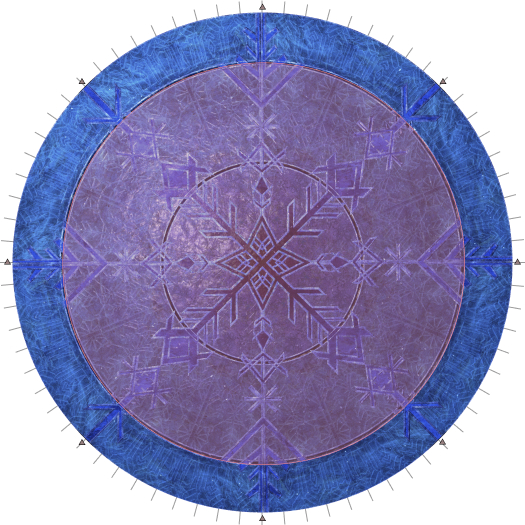 Use the outer ring on the floor. | 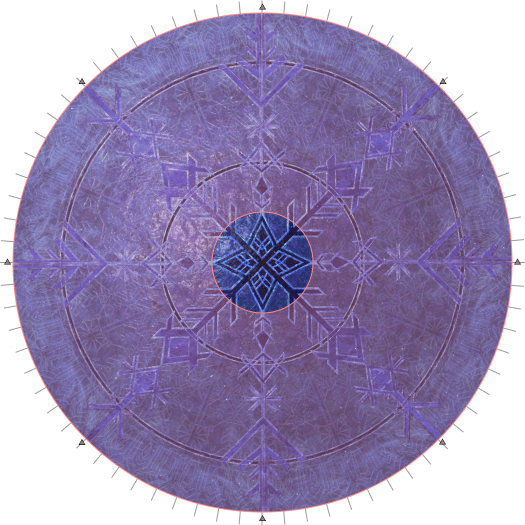 Use the star/shuriken in the center of the floor. |
| 3. Then, either the tanks/healers or the DPS will be selected to drop AoEs.
This may necessitate that the entire party rotate 45 degrees clockwise from their spread positions. (i.e: Rotate if the AoEs spawn on the first white circles.). | |
| Tank/Healers dropping AoEs, Circles on a cardinal | DPS dropping AoEs, Circles on a cardinal |
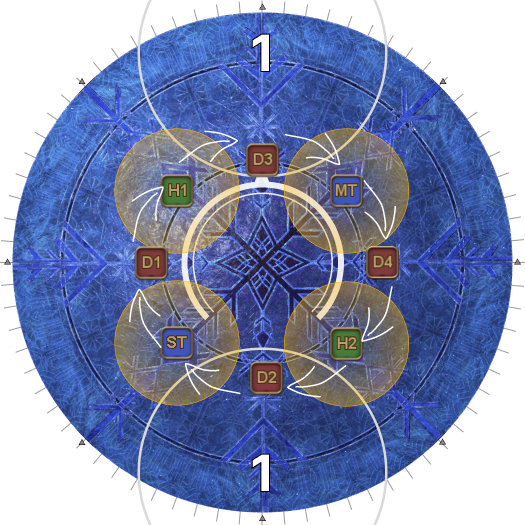 |  |
| Tank/Healers dropping AoEs, Circles on an intercardinal | DPS dropping AoEs, Circles on an intercardinal |
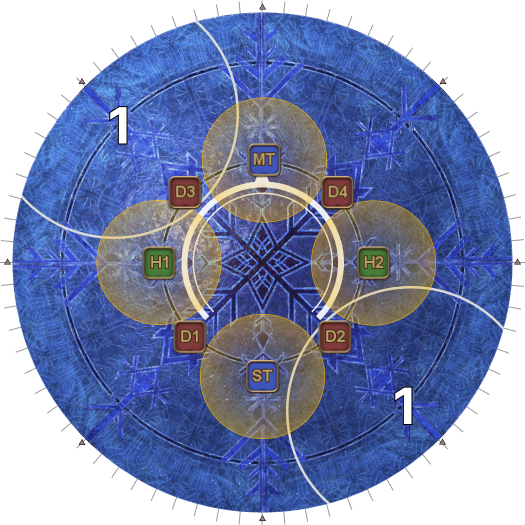 | 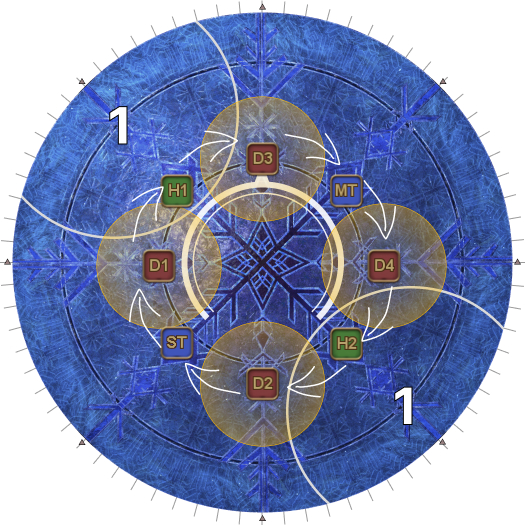 |
| 4. The Axe/Scythe Kick will also fire a cone AoE towards the four closest players.
| |
| Axe Kick | Scythe Kick |
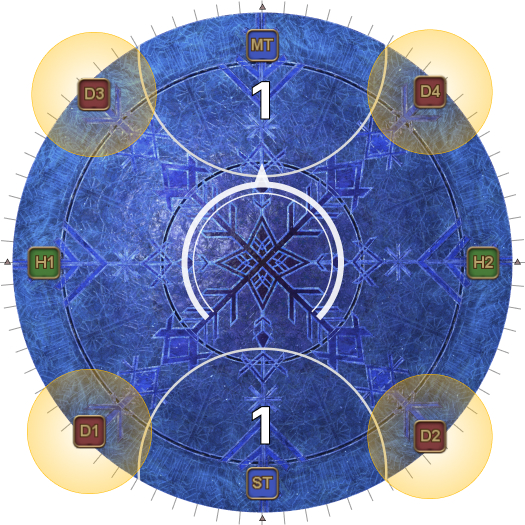 | 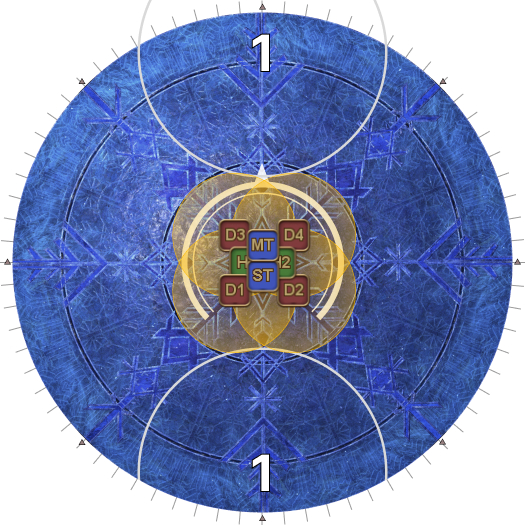 |
| 5. As soon as the Axe/Scythe castbar finishes, immediately move to either dodge the first circles (if Axe Kick), or stay at the edge to drop your AoEs (if Scythe Kick). (This step happens very quickly.) | |
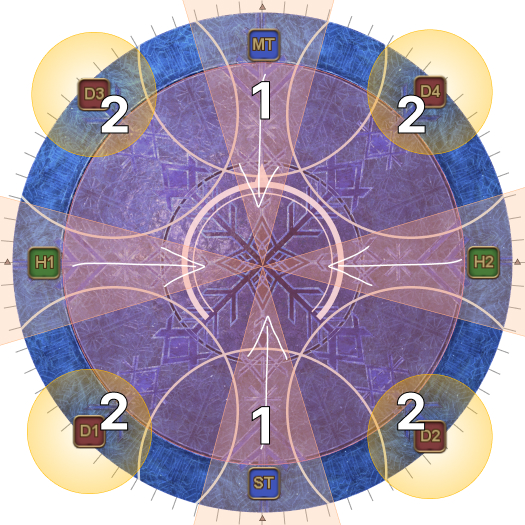 | 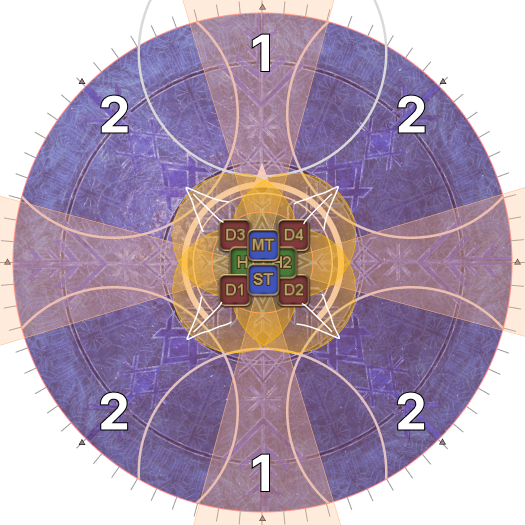 |
| 6. Everyone comes in and stacks together in preparation for a knockback where the first circles were.
Star-shaped AoE telegraphs (Frigid Needle) appear where the AoEs were dropped earlier. The Oracle's Reflection will also teleport to a random cardinal or intercardinal. | |
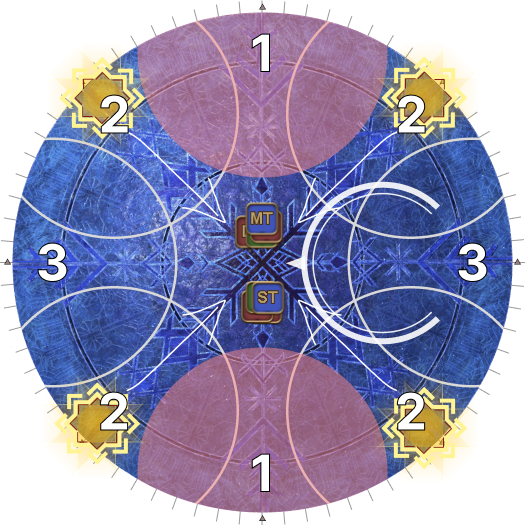 | 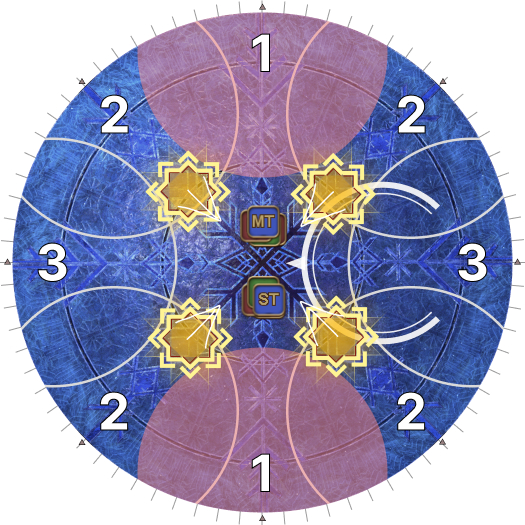 |
| 7. Knockback from the center into where the first circles were. The second circles will also resolve. Wait here for the star AoEs to resolve. | |
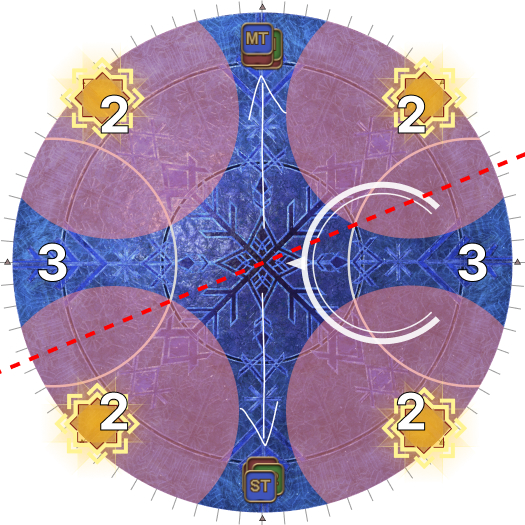 | 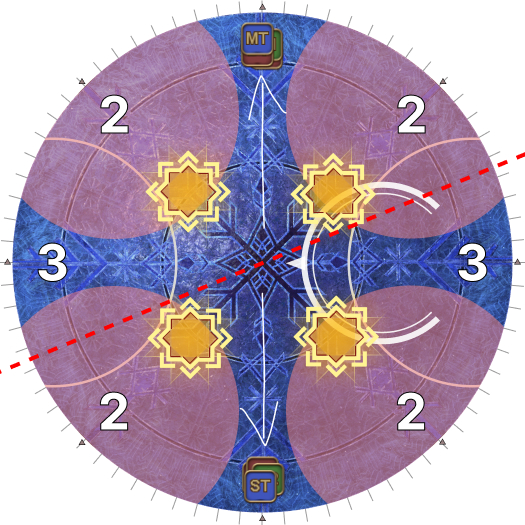 |
| 8. Star AoEs resolve. Identify whether the Oracle's Reflection is, as this determines how you will move in the next step. | |
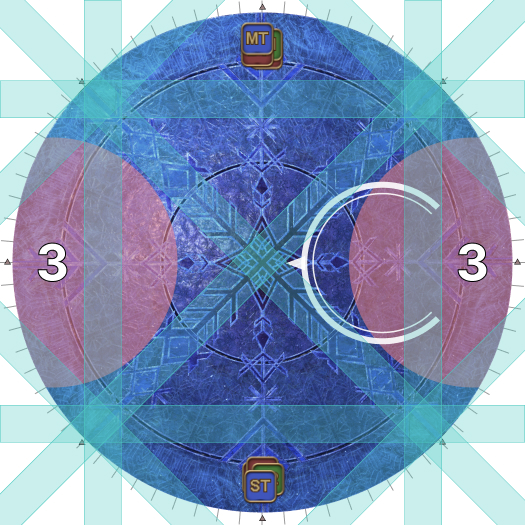 | 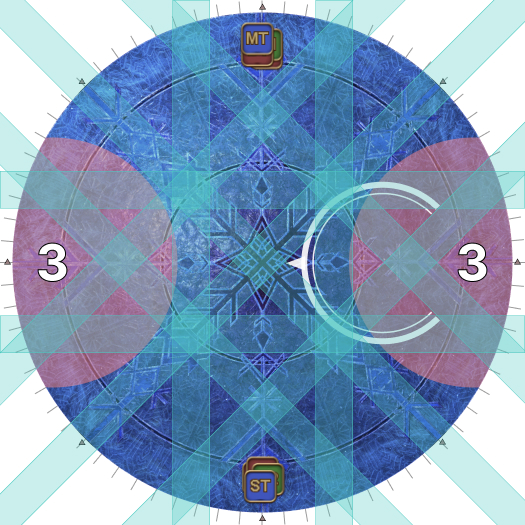 |
Sunbound Holy
The Oracle’s Reflection then casts Sunbound Holy, which targets each healer four times with a 4-man stack AoE that also leaves a puddle behind. Each party needs to drop these puddles and end up either directly behind the boss, or at least 135 degrees away from the boss.
Because the Usurper of Frost teleports to a random cardinal/intercardinal position, we have four possible cases.
Essentially (with the exception of the first puddle), the party cannot drop the puddles directly behind the Usurper of Frost.
| Case 1: The Usurper of Frost is at the same position as either party. Move as soon as the star AoEs go off. You can drop the first Akh Morn puddle behind the boss (as it will disappear), but not the second. Quickly run clockwise 180 degrees around the arena- you need to drop four puddles and still make it to the other side. When the floor turns to ice, slide so you're in front of the Usurper of Frost. | 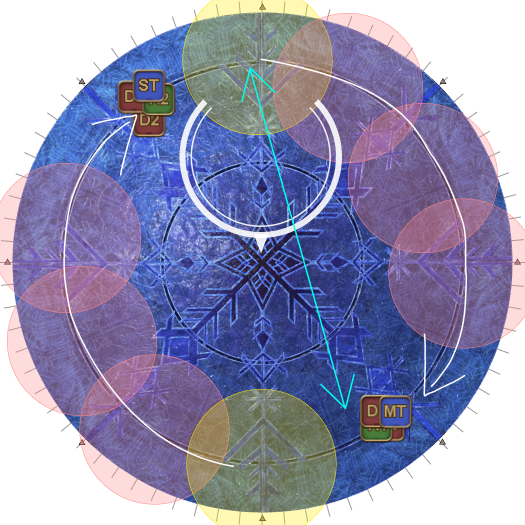 |
| Case 2: The Usurper of Frost is 90s degrees from both parties. In this scenario, both parties move clockwise slowly, and end up directly in front and behind the Usurper of Frost. | 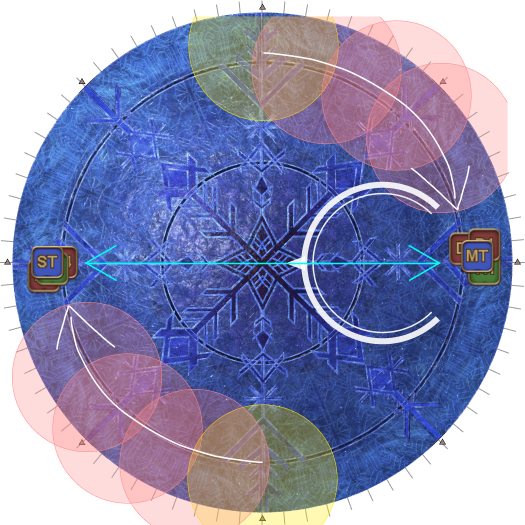 |
| Case 3: The Usurper of Frost is 45 degrees anti-clockwise from a party. In this scenario, both parties move clockwise quickly, and end up directly in front and behind the Usurper of Frost. | 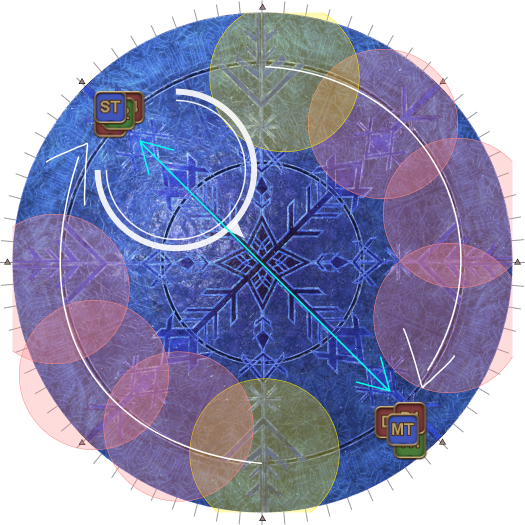 |
| Case 4: The Usurper of Frost is 45 degrees clockwise from a party. The party closest to the Oracle of Frost cannot drop their puddles directly behind the Oracle of Frost, so they will slowly go anti-clockwise. The party further from the Oracle of Frost will go slowly clockwise. Both parties will meet 135 degrees away from the boss, and the next movement will be slanted. | 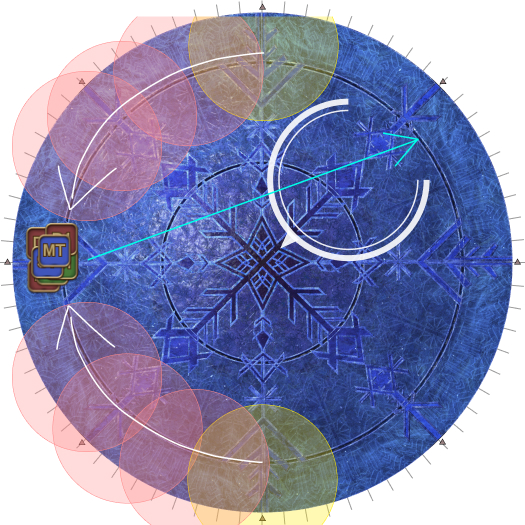 |
We need the two parties to be behind or at least 135 degrees away from the Oracle’s Reflection to prepare for the next mechanic.
| 9. The Oracle's Reflection and Usurper of Frost will switch forms:
At this point, if you are not directly behind the Oracle's Reflection, slide across the arena to be roughly opposite (in particular, if you started directly opposite the boss earlier). | 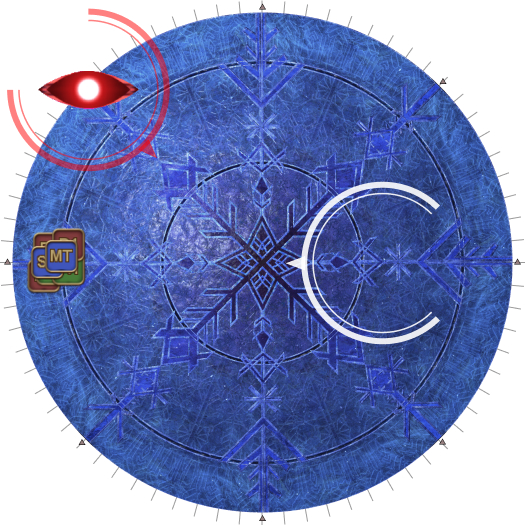 |
| 10. The Oracle's Reflection will now ready either Twin Silence or Twin Stillness.
| |
| Twin Silence | Twin Stillness |
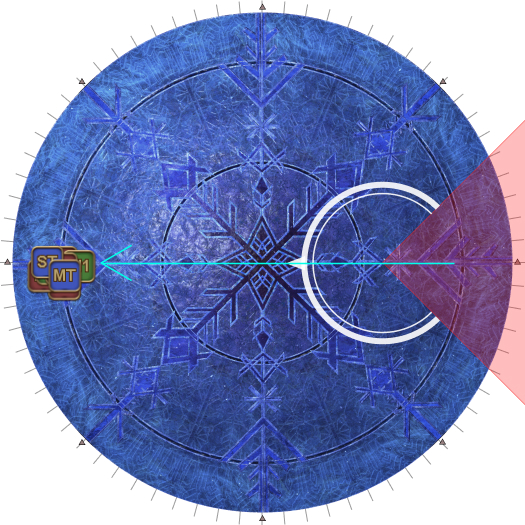 | 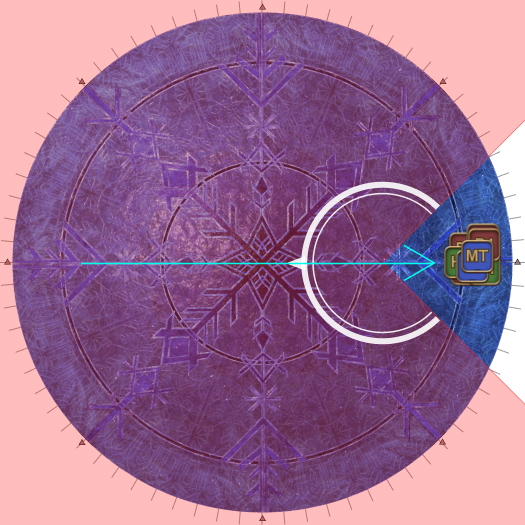 |
| 11. The boss will quickly follow it up with the opposite attack, so slide in/out again as necessary. | |
The Usurper of Frost reappears back in the center of the arena and casts Hallowed Ray on the party (which is a heavy-hitting line stack) before starting the next set of mechanics.
Mirror, Mirror(鏡の国)
The Usurper of Frost will be targetable during this mechanic.
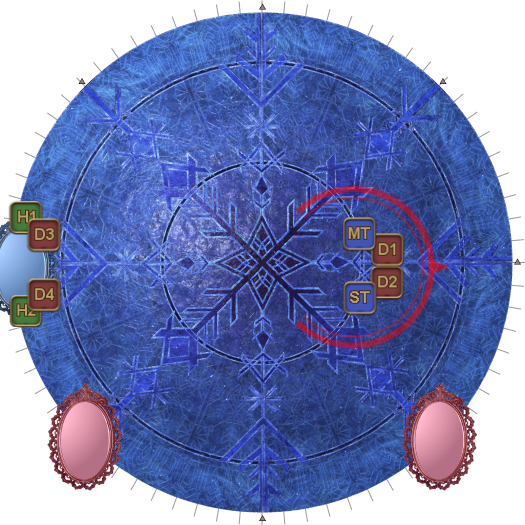
Two red mirrors and one blue mirror appear at the edge on any of the eight cardinal/intercardinal positions.
- Blue mirrors copy the Usurper of Frost’s attack, resolving at the same time.
- Red mirrors copy the Usurper of Frost’s attack, but resolves later.
- The two red mirrors always spawn 90 degrees from one another.
| 12. Find the blue mirror.
|  |
| 13. The Usurpur of Front will ready Scythe Kick, which also fires four cone AoEs at the four closest players. This attack will be recorded by all the mirrors, and the blue mirror's copy will resolve together with the boss. Spread out around the boss and the mirror to avoid both Scythe Kick and the cone AoEs.
When spreading, put the tanks/healers at the sides, with the DPS in between.
To avoid getting hit by the Scythe Kick, either be inside the boss's targeting circle or 2 pips away from the cardinal/ intercardinal marker. | 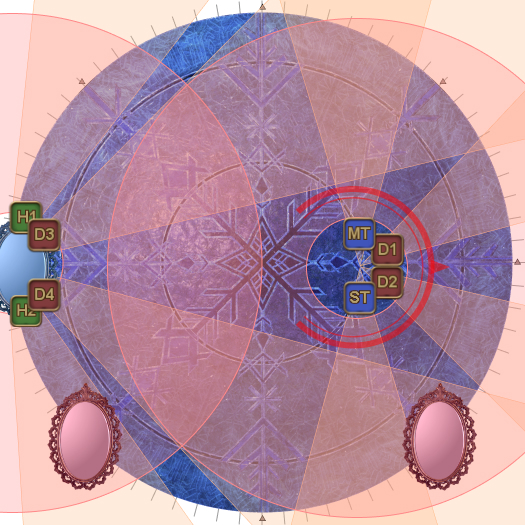 |
| 14. Move the boss to the (nearest) red mirror. (If both red mirrors are equidistant, rotate clockwise.) The healers and ranged will go to the other red mirror. Spread out beside the red mirrors, making sure not to hit the other group with the cone AoEs. | 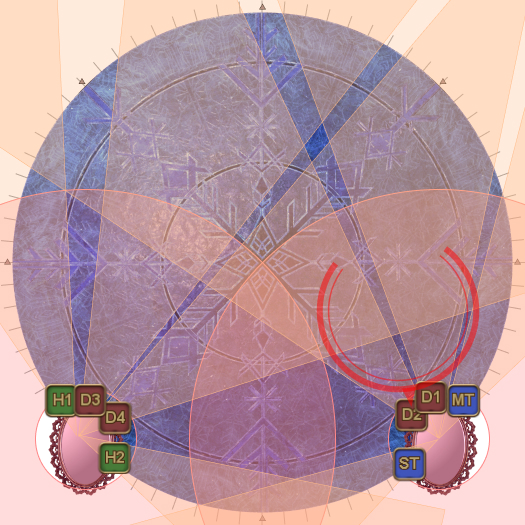 |
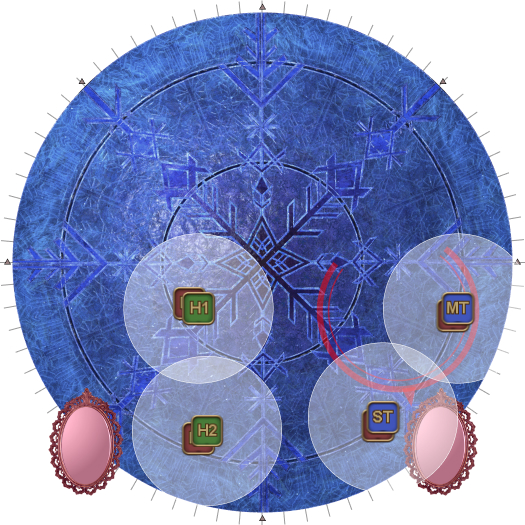
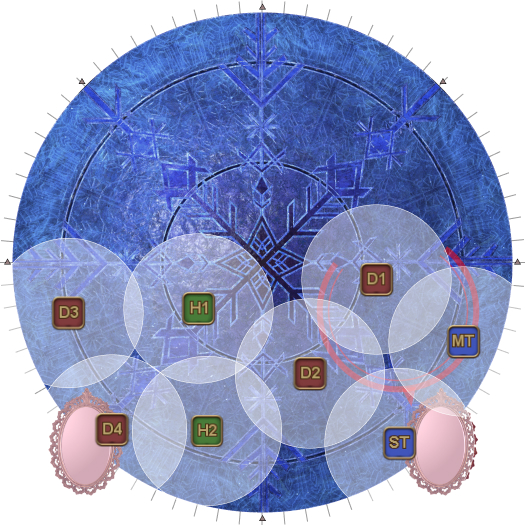
| 15. The boss will then cast Banish III. This will either be a party spread, or pair stacks depending on the number of orbs above the boss's head. The healers will move towards the center of the arena, while the tanks stay at the edge. The DPS adjust to the tanks and healers, depending on the number of orbs above the boss.
| |
| One orb (T/H + D pairs) | Four orbs (spread) |
 |  |
After this, the boss will teleport to the middle and begin another signature mechanic.
Light Rampant(光の暴走)
Two players at random will be selected to drop AoE puddles, while the other six will get tethered together (Chains of Everlasting Light).
- After 10 seconds, the Chains of Everlasting Light debuff will turn into Curse of Everlasting Light. From this point on, the raid wipes if the tethers get too short.
- Two connected players will also have a 16 second The Weight of Light debuff. When the timer expires, this explodes with a 4-man stack.
There will also be six stacks of Lightsteeped randomly distributed among the party.
[Click to Expand] Light Rampant debuffs
 | Chains of Everlasting Light Bound with chains of everlasting light. Will be subject to a Curse of Everlasting Light when this effect expires. Six players will get this debuff.
|
 | Curse of Everlasting Light Cursed by everlasting light. Close proximity to the player to whom you are bound will result in unaspected damage to those nearby.
|
 | Lightsteeped Overflowing with astral energy. Upon accumulating 5 stacks, you will deal unaspected damage to those nearby.
|
 | The Weight of Light Will unleash Powerful Light when this effect expires.
|
| 16. Stand between the markers to make a ring around the boss with tanks and healers North, and DPS South. | 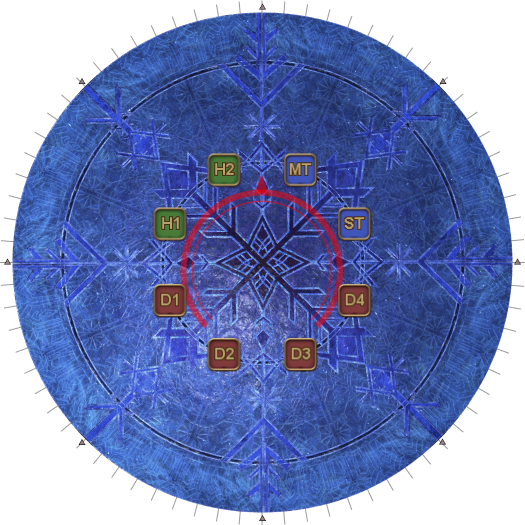 |
| 17. Two players at random will be selected to drop AoE puddles. There will also be six stacks of Lightsteeped randomly distributed among the party (although no player can start with more than two stacks). The other six players will get tethered together. The tether will likely connect to the nearest player, making a connected ring if all goes well. Six towers will also spawn around the arena. | 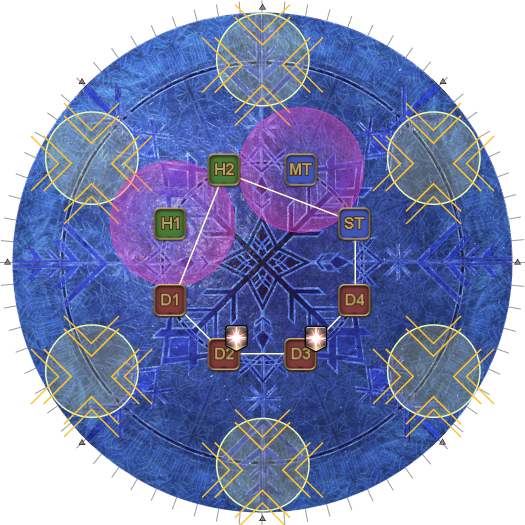 |
| 18. The two puddle players move just South-West and North-East of the center, and prepare to drop five puddles, one after the other. | 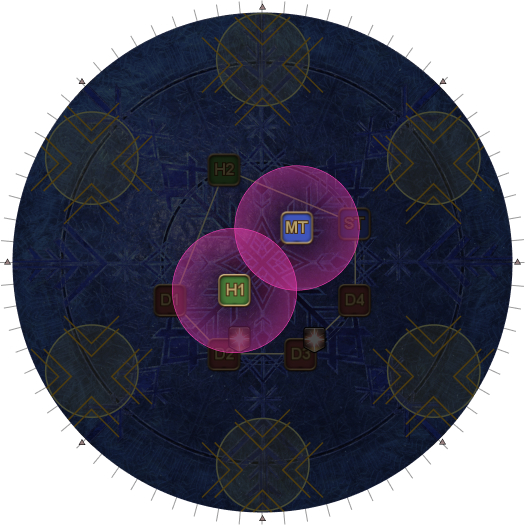 |
| 19. At the same time, we need to sort out the tethers. Starting from H1 and going clockwise, count up the tethered players. (It will be easier for the DPS to count anti-clockwise from D1 instead.) | 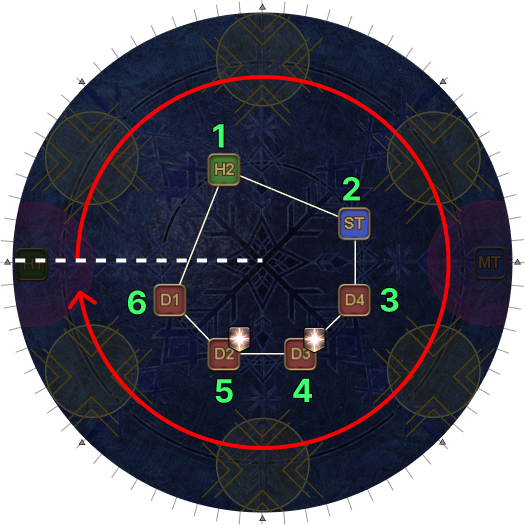 |
| 20. We assign towers based on player positions in the ring:
It is good practice to take the tower at the edge of the arena, to avoid getting accidentally clipped by the two players dropping puddles in the center. | 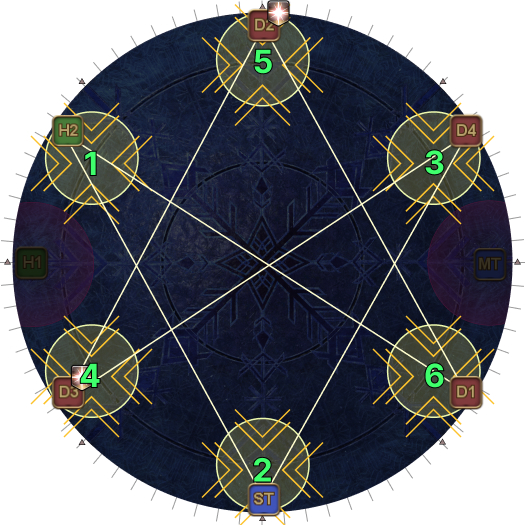 |
| 21. The two puddle players drop one puddle towards the outside, before rotating clockwise, dropping five puddles in total before joining their group NNE and SSW. The tether players wait for their towers to resolve (Bright Hunger) before collapsing with their group. | 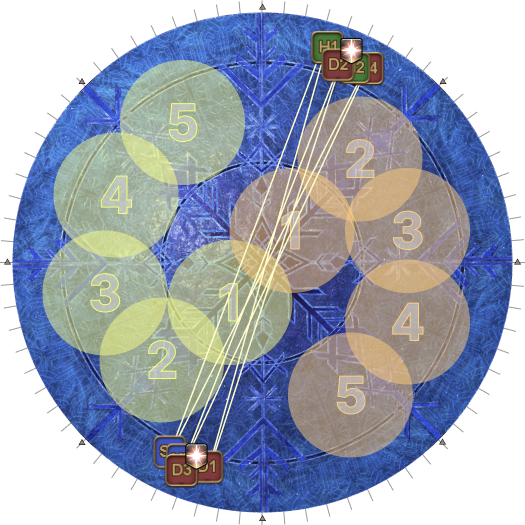 |
| 22. Three white orbs will spawn in an equilateral triangle and telegraph an AoE, which you should avoid. The timers on the two The Weight of Light debuffs will also expire, resulting in a 4-man stack (Powerful Light). Wait when the stack resolves- the orb AoEs have not yet resolved. | 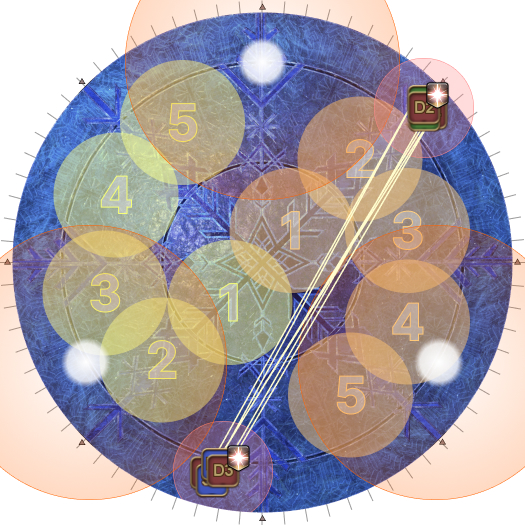 |
| 23. The tethers will disappear. Move into the first set of orb explosions as another three white orbs will spawn in the previously unoccupied spots and telegraph an AoE. Simply avoid these. A 4-man tower will spawn in the center of the arena. | 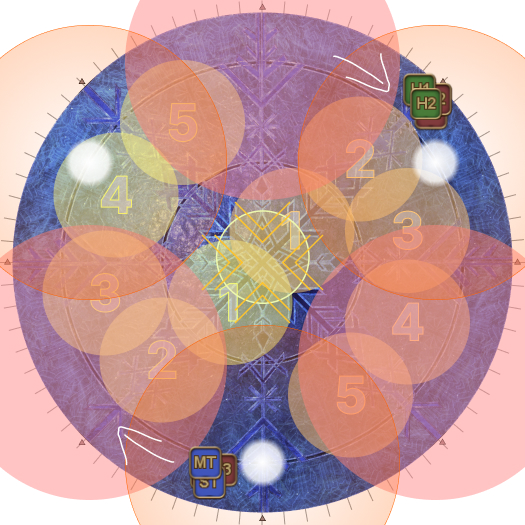 |
| 24. The second set of orbs explode. Check how many stacks of Lightsteeped you have. | 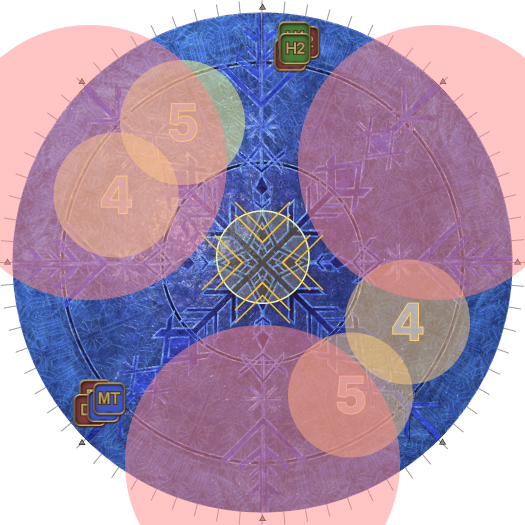 |
| 25. We now resolve the 4-man tower in the middle.
Everybody else move to your standard clock positions around the tower. | 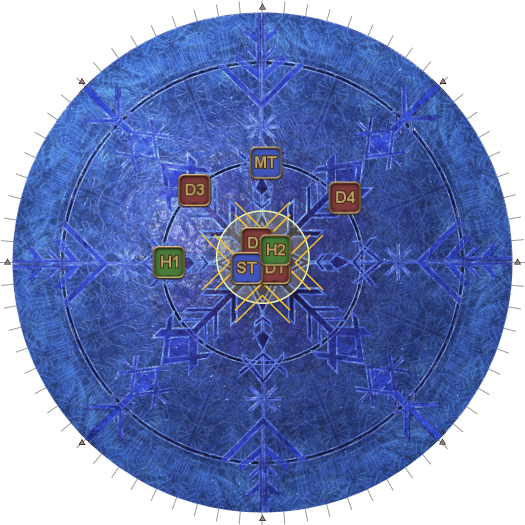 |
| 26. The boss will then cast Banish III again. Just like before, this will either be a party spread, or pair stacks depending on the number of orbs above the boss's head.
(In this example, the boss is doing pair stacks.) | 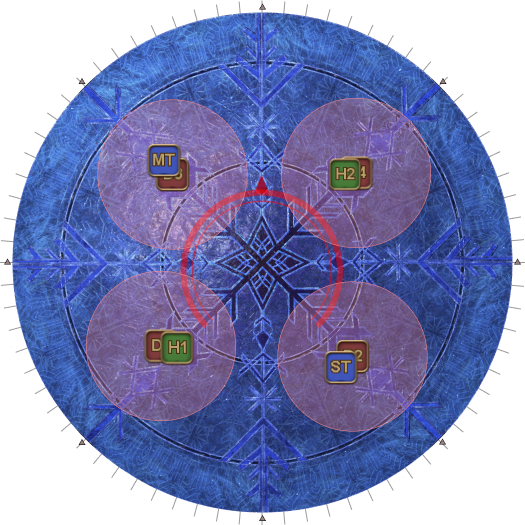 |
| 27. Finally, the boss becomes targetable again and starts casting The House of Light, which cleaves all players and gives a stack of Lightsteeped. Spread out in your standard clock positions to resolve this. | 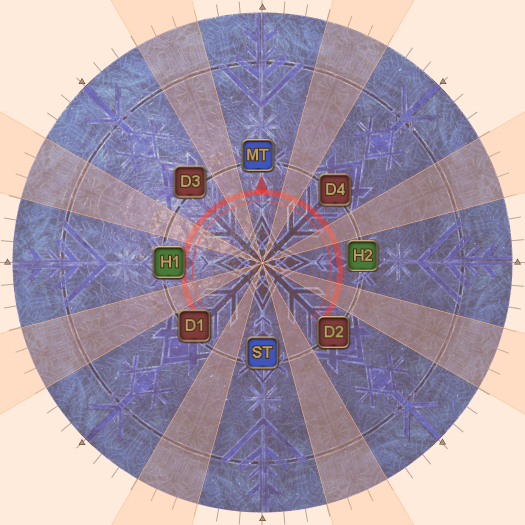 |
The tower positions can be summarized as follows:
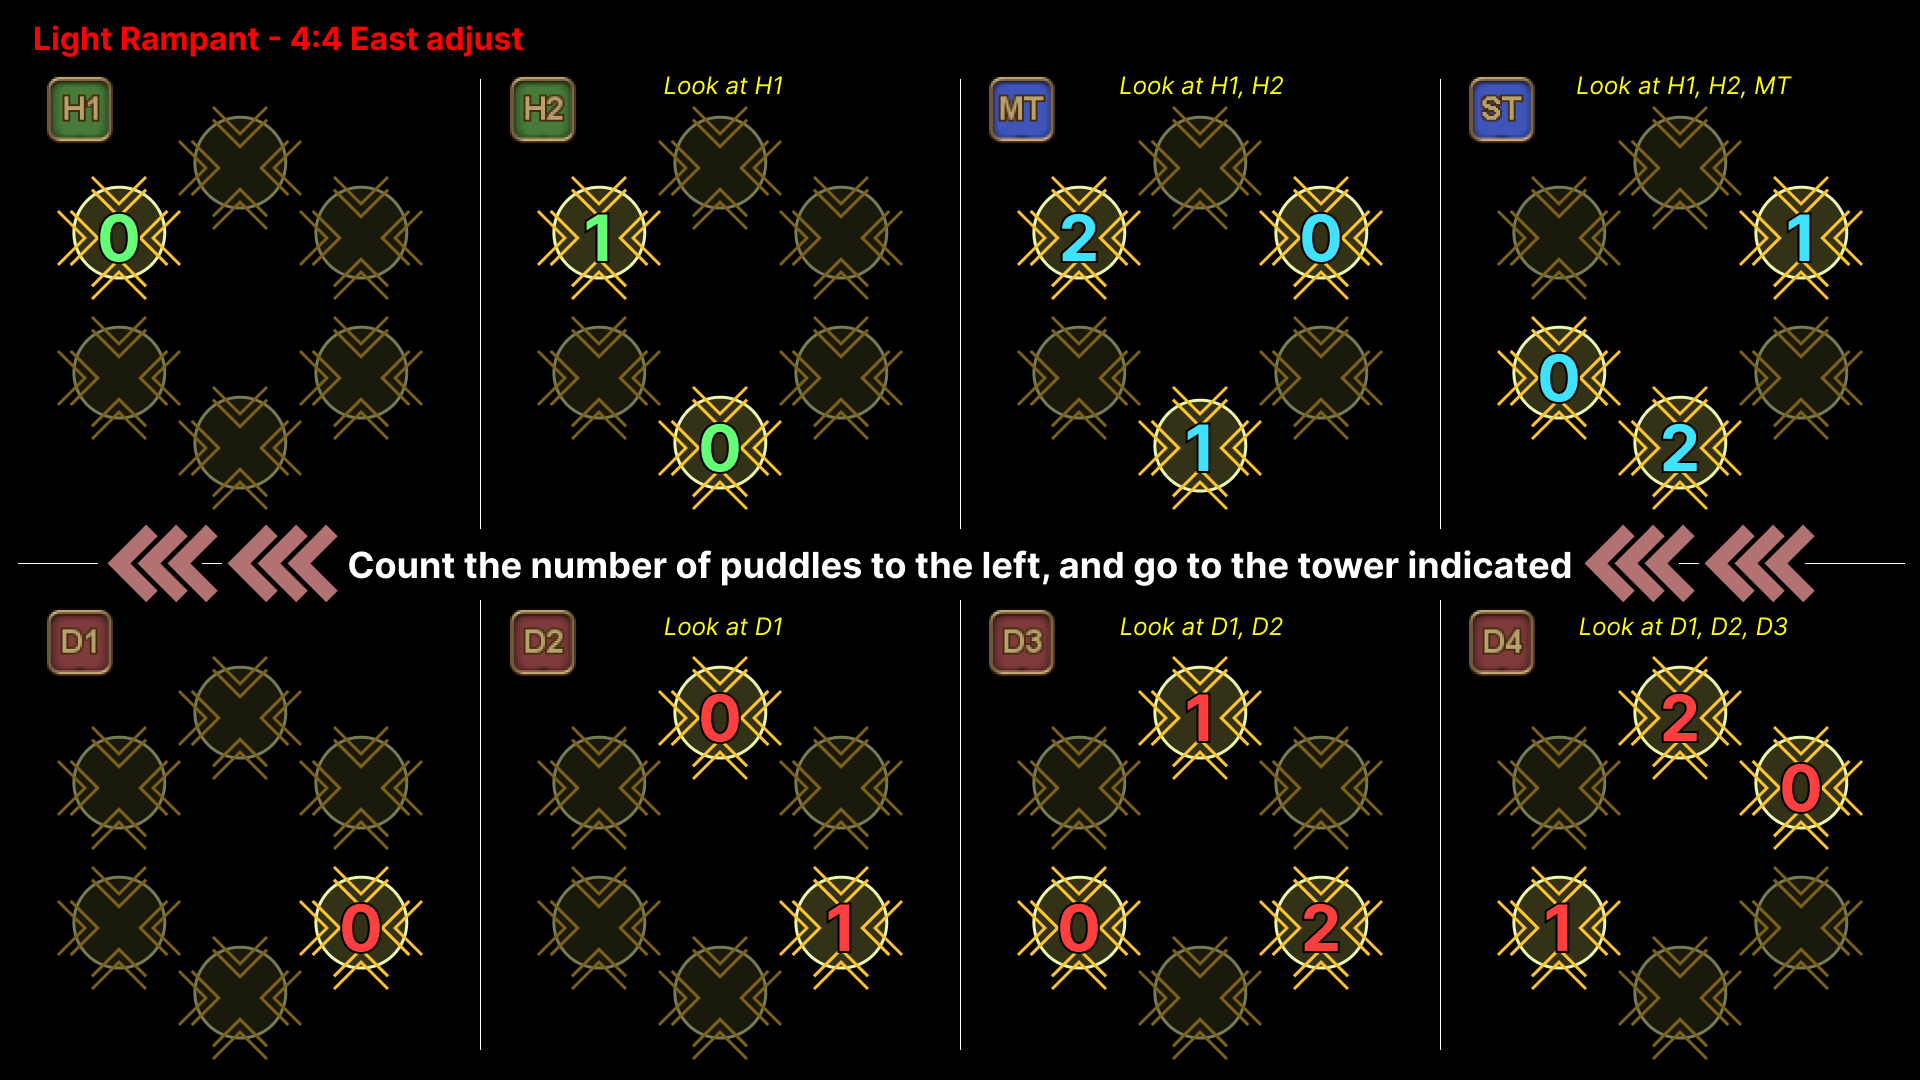 (Full-size image: English)
A few seconds later, the boss will start to cast Absolute Zero. This will serve as the hard enrage, unless the boss is brought under 20.0% HP.
If the DPS check is met, Absolute Zero will be a raid-wide and a knockback instead, so stay near the middle.
Endless Ice Age
This is the mini “transition” phase.
Tip: You can choose to caster LB3 all the crystals instead to get past this phase and get some P3 practice in instead- if you do so, you will not be able to get past P4 (although you will have until then to stabilize this phase).
If you caster LB3, remember to attack the Crystals of Light while waiting for the LB3 to resolve- the LB3 alone will not destroy the Crystals of Light.
Once all the Crystals have been destroyed, the Ice Veil will lose its invulnerability and can be destroyed (without Gaia's help).
| 29. Pre-position for Absolute Zero's knockback. Note the spread positions here are different. | 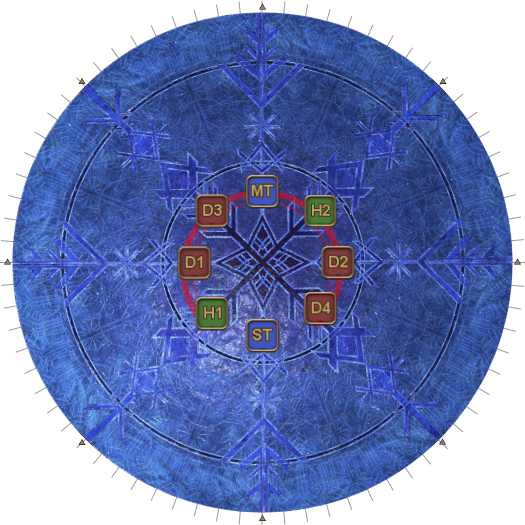 |
| 30. Four Crystals of Light and four Crystals of Darkness appear as shown in the diagram. The objective is to destroy the Ice Veil in the middle that's casting Endless Ice Age without destroying the four Crystals of Darkness. However, while the Ice Veil is targetable, it is immune to damage while there is a Crystal of Light on the arena. The healers/ranged DPS should help their tank/melee partner destroy the Crystal of Light in their sector first. | 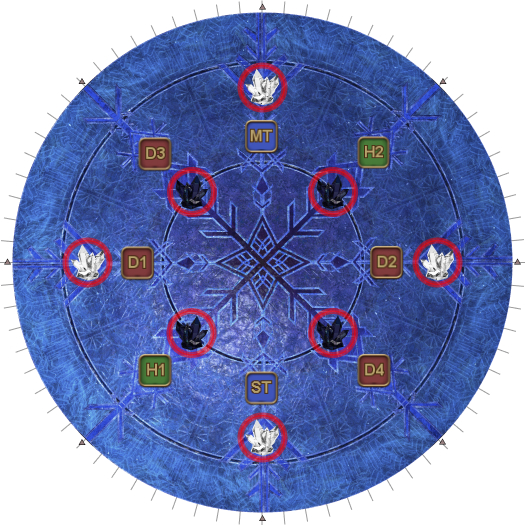 |
| 31. The tanks and melee DPS manage the Crystals of Light:
The healers and ranged DPS manage the Crystals of Darkness:
To avoid hitting other players, have everyone bait their first set of AoEs skewed clockwise (to the left, facing in), and alterate between left and right. | 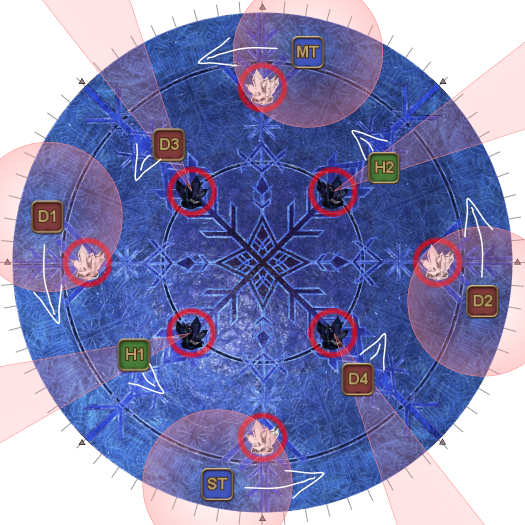 |
| 32. Bait the second set of AoEs skewed anti-clockwise (to the right, facing in). | 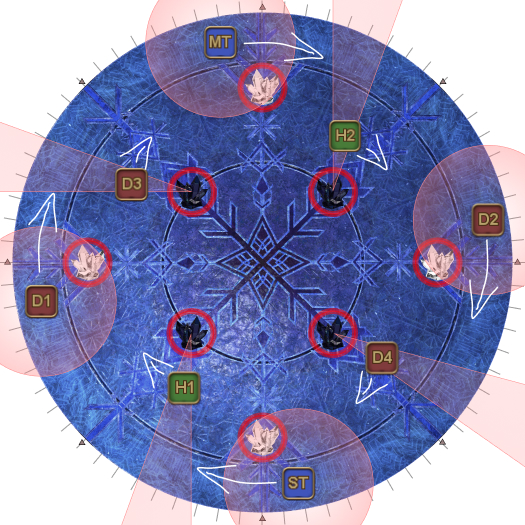 |
| 33. On the third set of telegraphed AoEs, the Crystals of Light will tether to the nearest player. |  |
| 34. On the fourth set of telegraphed AoEs, the tethered players will start dropping puddles that stay on the arena. Stepping into these puddles will inflict a lethal Bleed on you. | 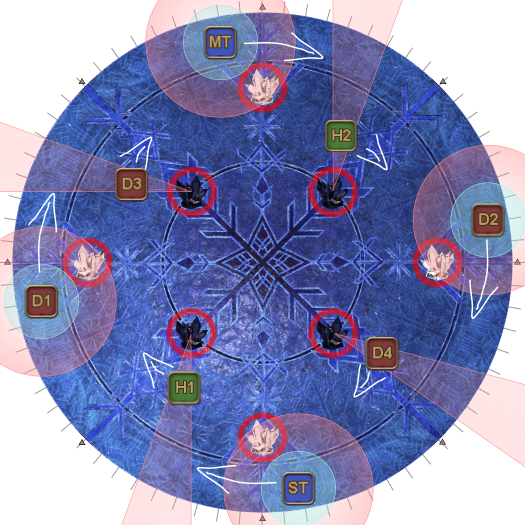 |
| 35. Bait these puddles around the Crystal. Note that even after the Crystals of Light have been destroyed, the Crystals of Darkness are still on the arena, and the cone AoEs still need to be properly baited. | 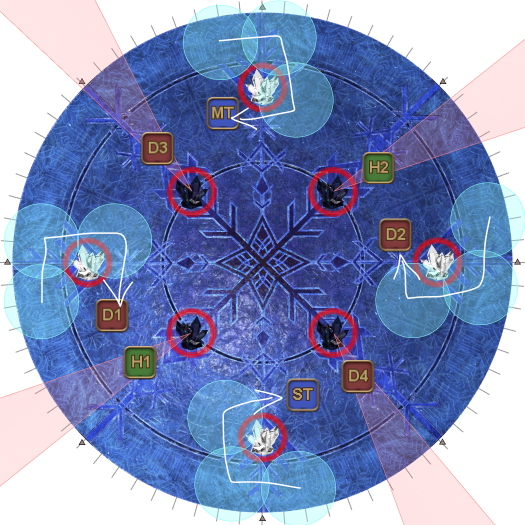 |
Once the four Crystals of Light have been destroyed (with all four Crystals of Darkness alive), Gaia will exclaim, “My power surges!” and the Ice Veil will lose its invulnerability.
If all the Crystals of Darkness are still alive, Gaia will gain enough power and deal 50.0% damage to the Ice Veil just before Endless Ice Age resolves. As a result, the damage check is to get the Ice Veil below 50.0% HP.
If all goes well, an ice necklace will briefly appear on the ground next to the Usurper of Frost, which will be quickly absorbed.
Stack south to prepare for the next phase- the Usurper of Frost will do one raid-wide (called Junction) and reveal herself to be Mitron before possessing Gaia and turning her into the Oracle of Darkness.
Frequently Asked Questions
[Light Rampant] What prevents both stacks from being on the same side?
| The two stacks are always tethered together. Because connected players alternate between North and South, this results in one stack North, and one stack South. |
[Crystals] What happens if you destroy all the Dark Crystals?
| Nothing immediate happens, and you can still progress through the fight. However, the Fragment of Fate in P4 will have its memory changed as a result. As a result, you can still progress through to the end of P4, but you will get the "bad ending" where Eden's Promise spawns and wipes the raid. Additionally, if a Dark Crystal is destroyed, the Ice Veil becomes invulnerable until all the Dark Crystals are destroyed, leading either to an enrage, or the bad ending. |
[Crystals] What leads to "the eternal ice shatters and disappears?"
| In order for the ice necklace to not shatter, Gaia must complete her jump attack. For her to do so, all four Crystals of Darkness must stay alive, and the Ice Veil must also live long enough. As such, the failure cases are either:
|
Troubleshooting
[General] We can't meet the DPS check during the Crystals phase!
| The crystals phase can be made significantly easier if you hold damage, and kill Fatebreaker towards the end of his enrage cast. This will synchronise your 2-minute burst with the start of the crystals phase, which should get you past the DPS check. (You should also use your second pots as soon as you can in the crystals phase for them to be back up in P4.) |
[Diamond Dust] Any tips for aiming my slide on a controller during Twin Silence/Stillness?
| For context, this is a problem specific to playing on a controller. Keyboards don't have this problem because pressing "W" moves your character perfectly forward. On a controller, pushing the analogue stick forward will not be perfect, so that slight deviation may be enough to get you killed. Something that might help would be to set up a macro like so: /automove on /automove off This will make your character take one tiny step directly forward where your camera is facing. |
[Light Rampant] What is Inescapable Illumination?
| Inescapable Illumination is the raid-wide (and damage down) as a penalty for not taking a tower. |
[Light Rampant] How do you prevent the tethers from getting tangled?
| Unfortunately, having tangled tethers is uncommon (less than 2/21 chance), and there is no way to guarantee that you will never encounter tangled tethers due to the way Light Rampant issues the debuffs.
Because of this, it is possible to get tangled patterns if:
In the example on the right:
If the tethers are tangled, then the tethers will criss-cross. Swap the two players around (H1 and H2 in this example) to untangle the tethers. | 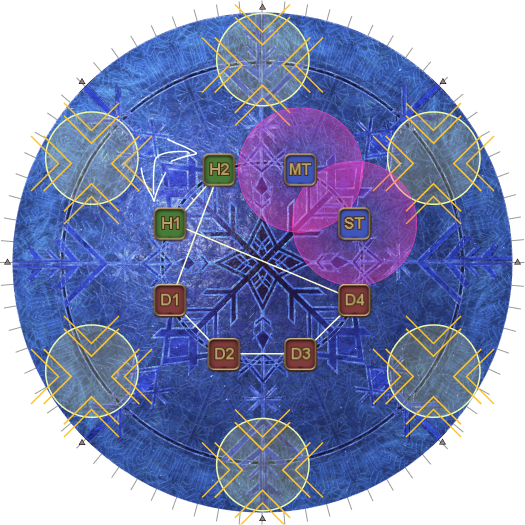 |
[Crystals] What does it mean when Gaia says "Is my Darkness not enough!?"
| Destroying all the Crystals of Light will make the Ice Veil vulnerable, and Gaia will exclaim "My power surges!" and try to do her attack. However, Gaia will only succeed if all the Crystals of Darkness are still alive. If any Crystals of Darkness have been destroyed, Gaia's attack will fail, and she will question "Is my Darkness not enough!?", indicating something has gone wrong. |