AAC Light-heavyweight M4 (Savage)
Game8.jp has gone along with Nukemaru’s strat. Explanation has been split into two parts, even though this is a single encounter with no checkpoint.
Nukemaru has also split his guide into two parts:
First half:
(English subtitled)
Second half:
(English subtitled)
English
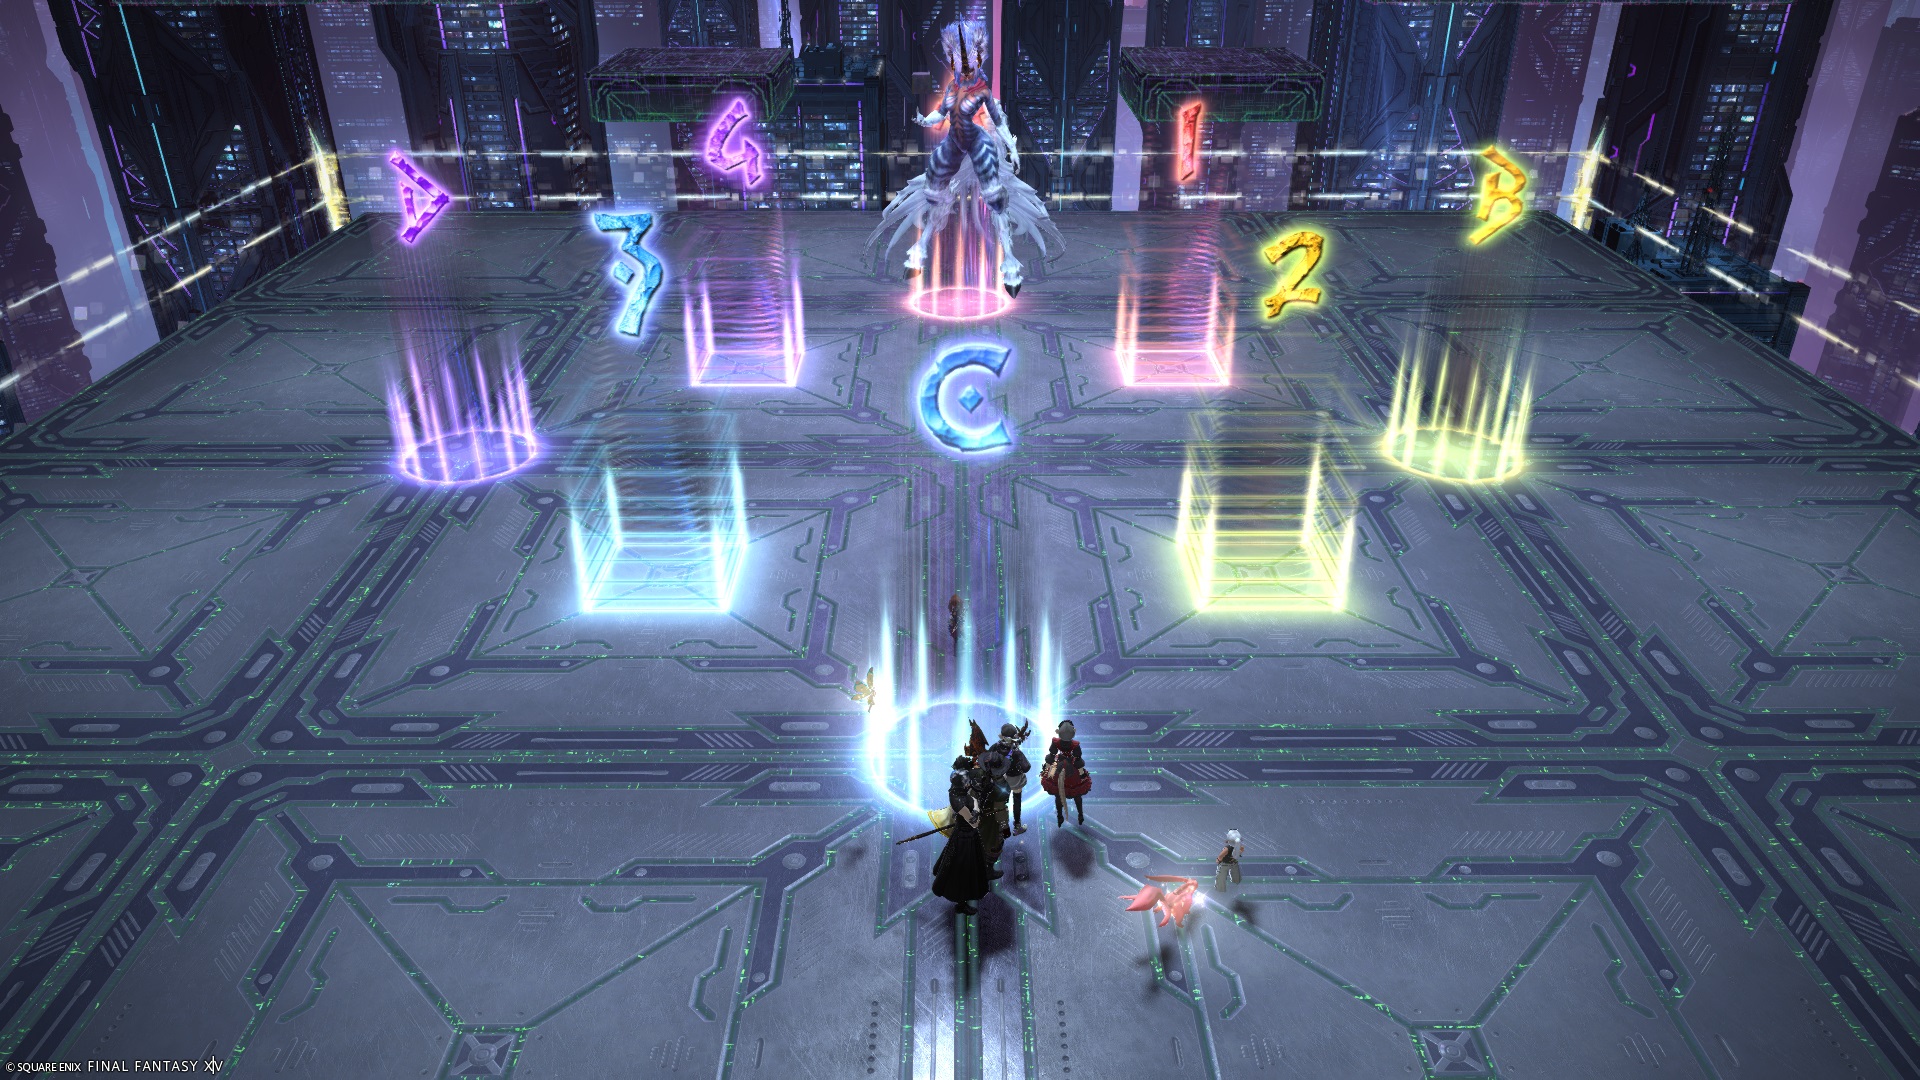
ー【Vert. Spread】ー【Witch Hunt (DN strat)】ー
  D3 D4    D3 MT D4 Baits:
  MT  ST     D1 ▲ D2  Near: TTMM
  D1 D2    H1 ST H2  Far: HHRR
  H1 H2
ー【Electrope Edge 1:Sideways Spark】ーーーー
  ☆MT D2 D4    ☆   ST/D2   H2/D4
   D1  ST H2   MT/D1
   D3  H1 ■    H1/D3
ー【Electrope Edge 2:Lightning Cage】ーーーー
   Spread    ↑ ■ ■ ■ ↑ ←T/H DPS→
  D3 MT D4  ■   ■  ■ 22s:2 or 3 zaps
  H1 ▲ H2      ■   42s:1 or 2 zaps
  D1 ST D2    ↓   ■ ↓  ↑:More
          ■ ■ s ■ ■  ↓:Less
ー【Electrope Edge 2:Sideways Spark】ーーーー
 ※ Flip horizontally as needed     D3
     TH↓           MT  H1
    ▲DPS↑ TH↑     ▲ D1  ST
     DPS↓         D2  H2
 ↑: More  ↓: Less         D4
ー【Ion Cluster】ーーーーーー【Transition】ーーー
  Purple        | D3/MT ST/D4
   Near/Far        |      ▲
 Blue Blue ※T/H at wall| H1/D1    D2/H2
 Blue Blue ※DPS inside|
   Near/Far        |※ Boss-relative
  Purple           |※ Dodge CW ⇒ CCW
ー【Wicked Blaze (Exaflares)】ーーーーーーーーー
 West : MT H1 D1 D3  East : ST H2 D2 D4
ー【Mustard Bomb】ーーーーーーーーーーーーーー
 D1  MT  ST  D2     Taking Debuff
 D3  H1  H2  D4  MT:D1D3H1H2D4D2:ST
ー【Midnight Sabbath】 ー【Raining Swords】ー
    MT D2    | MT ST (towers)
   D1    ST   | D1 D2
   H1   D4   | H1 H2
    D3 H2    | D3 D4
ー【Sunrise Sabbath】ー【Sword Quiver】ーーー
 ◇Towers/Beams  | MT/D1  ST/D2
 T/H:CCW from NW  |
 DPS:CW from N  | H1/D3  H2/D4
Japanese
■縦散開ーーーー■円輪・輪円(DN式)ーーーーーー
D3 D4        D3 MT D4
MT ST        D1 ☆ D2
D1 D2        H1 ST H2
H1 H2
■エレクトロープ1回目ーーーーーーーーーーーーー
MT D2 D4    | ☆ ST/D2 H2/D4
D1 ST H2    | MT/D1
D3 H1 角     | H1/D3
■エレクトロープ2回目
基本散開      |多 ■■■ 多   西:TH 東:DPS
D3 MT D4    |■   ■   ■   22秒:3回 or 2回
H1 ☆ H2     |少   ■   少   42秒:2回 or 1回
D1 ST D2     |■ ■ 他 ■ ■
・ペア散開             ・散開(北基準)
TH多:B,D  DPS多:中央 |      D3
TH少:A   DPS少:C   | MT     H1
                   | ☆D1 ST
                   |   D2     H2
                   |      D4
■ストリームーーーーーーエレクトロープ移植※ボス基準
  紫               |
 誘電              |  D3/MT  ST/D4
青    青 ※TH外側    |        ☆
青    青 ※DPS内側   |   H1/D1  D2/H2
 誘電             ※時計→反時計で往復
  紫
■ウィケッドブレイズ(エクサ)
西 : MT組 東 : ST組
■マスタードボム
D1 MT ST D2        デバフ受取優先順位
D3 H1 H2 D4    MT←D1D3H1 H2D4D2→ST
■夜半ーーーーー■剣の雨ーーー■剣の舞ーーーーー
  MT D2     | MT ST | MT/D1 ST/D2
D1      ST   | D1 D2 |
H1     D4  | H1 H2 | H1/D3 H2/D4
  D3 H2     | D3 D4 |
■日出
 《塔》           《誘導》
TH:南・西        TH:11時から反時計
DPS:北・東       DPS:12時から時計
Markers
- The markers are used for Narrowing/Widening Witch Hunt.
- The
Amarker is also used to reference North for the pair/spread positions during Electrope 1.
XIVLauncher WaymarkPresetPlugin positions
{
  "Name":"M4S (Nukemaru)",
  "MapID":992,
  "A":{"X":100.0,"Y":0.0,"Z":90.0,"ID":0,"Active":true},
  "B":{"X":110.0,"Y":0.0,"Z":100.0,"ID":1,"Active":true},
  "C":{"X":100.0,"Y":0.0,"Z":110.0,"ID":2,"Active":true},
  "D":{"X":90.0,"Y":0.0,"Z":100.0,"ID":3,"Active":true},
  "One":{"X":105.0,"Y":0.0,"Z":95.0,"ID":4,"Active":true},
  "Two":{"X":105.0,"Y":0.0,"Z":105.0,"ID":5,"Active":true},
  "Three":{"X":95.0,"Y":0.0,"Z":105.0,"ID":6,"Active":true},
  "Four":{"X":95.0,"Y":0.0,"Z":95.0,"ID":7,"Active":true}
}
Timeline

Team DN’s Witch Hunt
This was a strat used by Team DN that simplifies things by allowing players to ignore whether the baited dives will go on the near, or far players.
Note that the markers used in the diagrams before are the markers that are being populated by JP PF, and are not the markers that the group originally used.
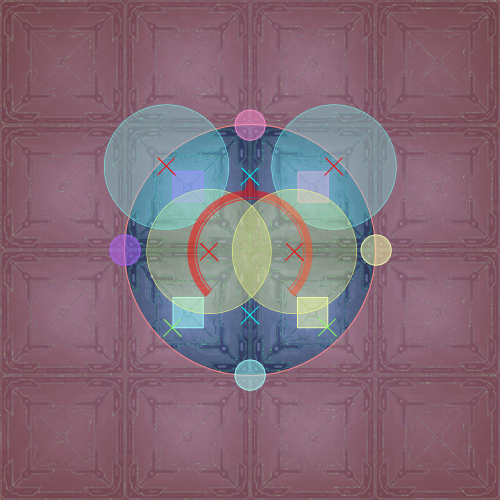
| Each role has two reference points that dodge the boss's Narrowing Witch Hunt or Widening Witch Hunt. Then, each reference point has two positions- one "inner" and one "outer" position. Using the diagram to the right, all players will dodge to the green → green → red → red marks, based on their clock positions. | 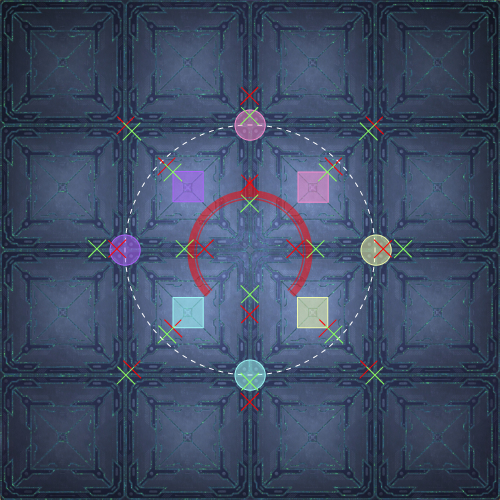 |
The reference points and positions are very specific:
| Inside reference point | Outside reference point | |
| Tanks + Melee | Use the boss's targeting circle.
| Use the cardinal waymark.
|
| Healers + Ranged | Use the intercardinal waymark.
| Use the junction where four tiles meet.
|
Once you have established the two anchor points, your dodges will go:
- Tanks + Ranged: Inner → Inner → Outer → Outer
- Healers + Melee: Outer → Outer → Inner → Inner
Put together, it will look like this:
| 1st and 2nd Witch Hunts:
The tanks will take the near-dives, while the healers will take the far-dives. | |
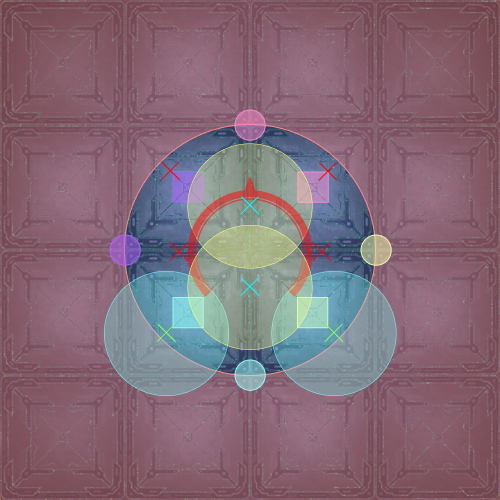 | 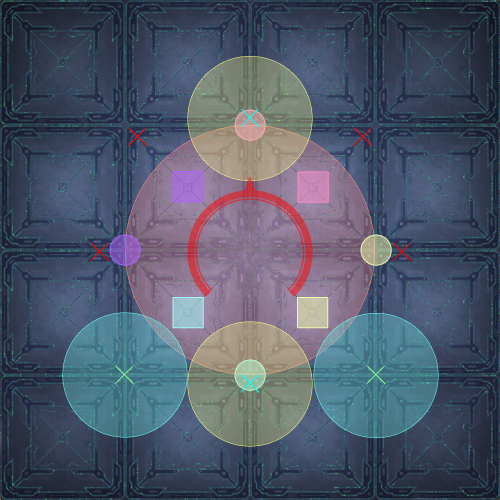 |
| 3rd and 4th Witch Hunts:
The melee will take the near-dives, while the ranged will take the far-dives. | |
 | 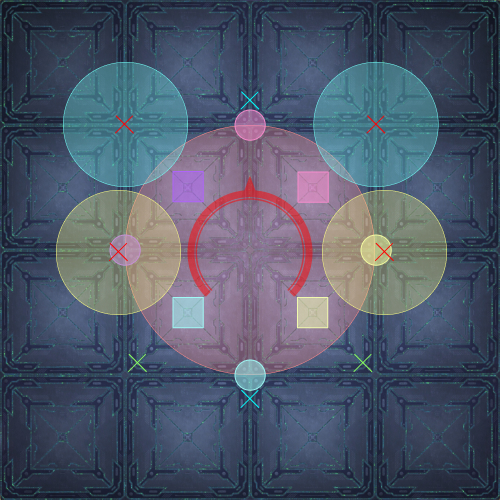 |
Electrope Edge 1
Which corners the boss zaps isn’t completely random.
If you’re having trouble determining the safe quadrants the “proper” way (tracking which corners only get zapped once), you can take advantage of this.
| West half | East half | |
|---|---|---|
| 1st hit | NW or SW at random. Whichever west-side quadrant was not hit first is potentially safe for Sideways Swipe. | NE or SE at random. |
| 2nd hit | NW or SW, whichever was hit first. | NE or SE, whichever was not hit first. |
| 3rd hit | NW or SW, whichever was not hit first. Whichever west-side quadrant was hit third is potentially safe for Sideways Swipe. | NE or SE at random. Whichever east-side quadrant was not hit third is potentially safe for Sideways Swipe. |
Kuuya’s Electron Stream
Kuuya’s Electron Stream is a method to resolve all the debuffs in Electron Stream that minimises movement and maintains melee uptime.
It is essentially identical to Team DN’s solution, however, Kuuya has tanks and healers drop their AoEs/donuts towards the wall, while DPS drop theirs towards the inside of the arena.
  | Roundhouse Conductor/Spinning Conductor Stand on the "rivet" towards the corner of the tile, towards the boss.
|
  | Proximate Current/Remote Current Stand just in front of the center of the tile (in front of the player with Collider Conductor). |
 | Collider Conductor Stand just behind the center of the tile (behind the player with Proximate/Remote Current). |
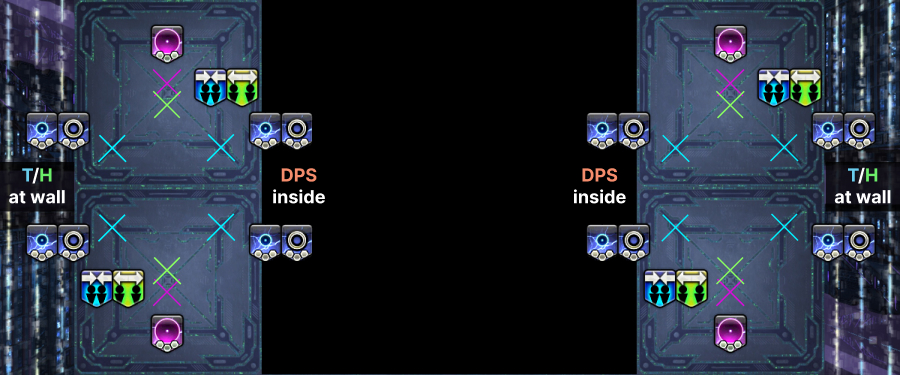 | |
Sunrise Sabbath
Resolving Sunrise Sabbath requires baiting the beams in specific positions (notice a pattern with this fight?) to not hit the players in the towers, and not get clipped by another player’s beam.
| As long as all players that are baiting lasers stand anywhere within the appropriate green regions below, they will not hit another player. Moving closer to the clone lowers the chance you get hit by another player's beam, but this is a tradeoff. As you get closer to the clone, the closer you also have to be to the death wall to not hit someone else with your own beam. |
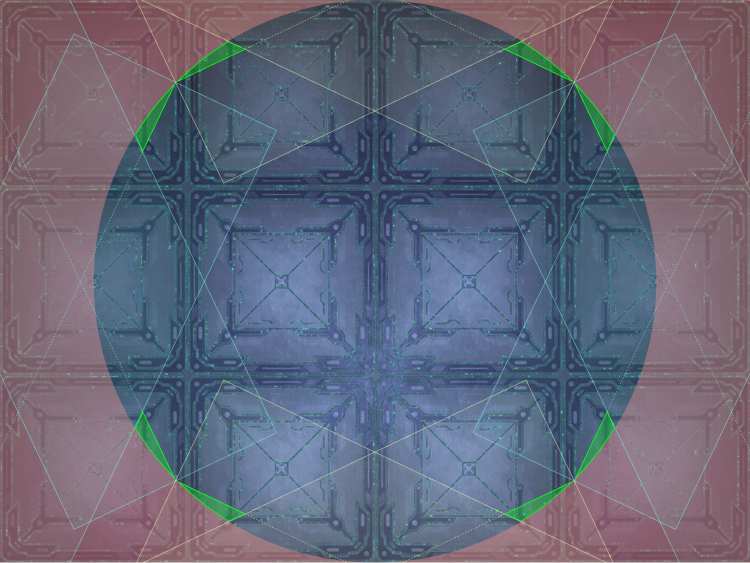 |
Frequently Asked Questions
[Damage Down] How strong is the damage down debuff in this fight?
| The Damage Down debuff in this encounter lowers a player's damage by 25% for 30 seconds. |
[Electron Stream] Why do we fix roles to go to the outside/inside instead of to the left/right?
| At least two groups independently came up with essentially the same solution, with the only difference being where the Conductor debuffs go.
Which scheme you choose is ultimately an arbitrary decision (although you can argue that having tanks/healers to the wall means the subsequent tankbuster always points outside). One Ace, being a Japanese group, has more influence over the Japanese player base, hence why tanks/healers go to the wall in the Japanese DCs. |