Oracle of Darkness(闇の巫女)
The Oracle of Darkness starts south, and immediately opens with Hell’s Judgment, which sets everyone to 1HP.
She will then teleport to the middle of the arena and prepare her first major mechanic with a heavy raid-wide.
Ultimate Relativity(時間圧縮・絶)- Poni Kone
When Ultimate Relativity resolves, there will be a lot of debuffs that go out. However, you only need to check a limited set of debuffs.
[Click to Expand] Ultimate Relativity debuffs
The following debuffs all resolve before Return resolves.
 | Spell-in-Waiting: Dark Blizzard III One player will get this debuff, and it will always be 20s.
|
 | Spell-in-Waiting: Dark Fire III Seven players will get this debuff, but with different durations.
However, either the 10s tank/healer Dark Fire III or the 30s DPS Dark Fire III will be replaced with a 20s Dark Blizzard III instead. |
 | Spell-in-Waiting: Unholy Darkness Three players will get this debuff, at 10s, 20s, and 30s.
|
  | Spell-in-Waiting: Return All players will get this debuff, but with different durations.
Return Spell-in-Waiting: Return turns into this debuff when it expires. The total duration of Spell-in-Waiting: Return and Return add up to 39s (so will resolve just before the 42s debuffs resolve.)
|
The following debuffs all resolve after Return, so will determine where players record their positions.
 | Spell-in-Waiting: Dark Eruption 3-4 players will get this debuff, and it will always be 42s (resolves after Return).
|
 | Spell-in-Waiting: Dark Water III The DPS mid Fire will get this debuff, and it will always be 42s (resolves after Return).
|
 | Spell-in-Waiting: Shadoweye 3-4 players will get this debuff, and it will always be 42s (resolves after Return).
|
The party can be split up into three groups based off the duration of each player’s Dark Fire III debuff.
- Three players (two DPS and one tank/healer) will get 10s Fire debuffs (the “short Fires”).
- Two players (one tank/healer and one DPS) will get 20s Fire debuffs (the “mid Fires”).
- Three players (two tanks/healers and one DPS) will get 30s Fire debuffs (the “long Fires”).
Either the tank/healer short Fire, or the DPS long Fire will have their Dark Fire III debuff replaced with Dark Blizzard III.
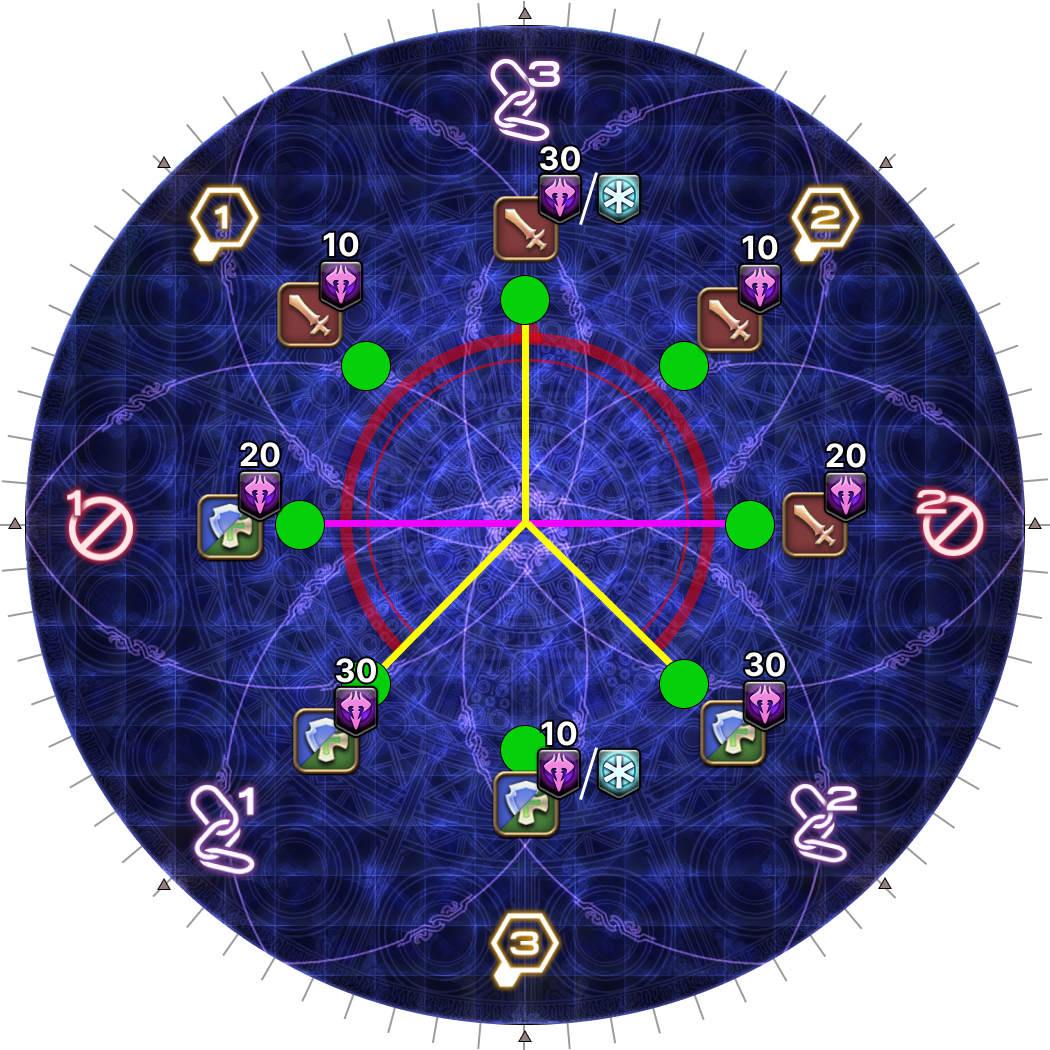
The first step is to assign hourglasses to players. The basic rules are:
- Short fires go to empty spots.
- Mid fires go to the purple tethered spots.
- Long fires go to the yellow tethered spots.
This is a tethers-relative assigment.
Each player is expected to carry a set of macros that do two things:
- Mark themselves with the appropriate marker based on whether you’re short, mid, or long Fire.
- Dump the sequence of mechanics (in order) in
/echochat.
[Click to Expand] Ultimate Relativity macros
Tank/Healer short Fire/Blizzard:
/micon attack3 marking
/mk attack3 <me>
/echo >---- T/H Short Fire/Blizzard: South ---- <
/echo Out for Fire (mid if Blizzard)
/echo Record at hourglass
/echo Stack (Blizzard)
/echo Bait laser
/echo Stack
/echo Face outside
/echo >----------------------<
Tank/Healer Mid Fire:
/micon ignore1 marking
/mk ignore1 <me>
/echo >---- T/H Mid Fire: West ---- <
/echo Stack
/echo Record at hourglass
/echo Out for Fire
/echo Wait in Mid
/echo Stack
/echo Bait laser → Dodge + face out
/echo >----------------------<
Tank/Healer Long Fire:
/micon bind1 marking
/mk bind <me>
/echo >---- T/H Long Fire: SW/SE ---- <
/echo Stack
/echo Bait laser
/echo Stack
/echo Record position
/echo Out for Fire
/echo Mid + face outside
/echo >----------------------<
DPS short Fire:
/micon attack1 marking
/mk attack <me>
/echo >---- DPS Fast Fire: NW/NE ---- <
/echo Out for Fire
/echo Record at hourglass
/echo Stack
/echo Bait laser
/echo Stack
/echo Mid + face outside
/echo >----------------------<
DPS mid Fire:
/micon stop2 marking
/mk stop2 <me>
/echo >---- DPS Mid Fire: East ---- <
/echo Stack
/echo Record at mid
/echo Out for Fire
/echo Wait
/echo Stack
/echo Bait laser → Dodge + face out
/echo >----------------------<
DPS Long Fire:
/micon bind3 marking
/mk bind3 <me>
/echo >---- DPS Long Fire/Blizzard: South ---- <
/echo Stack
/echo Bait laser
/echo Stack (Blizzard)
/echo Record at mid
/echo Out for Fire
/echo Mid + face outside
/echo >----------------------<
| The tethers make a shape like the kanji character 大, with a single yellow tether pointing upwards. Find the 大 and orient to it with the single yellow tether as North. Take up assigned clock positions based on your Fire group. |
 |
Once you have your assigned hourglass, you can resolve everything by staying in the center, only moving out to resolve specific debuffs.
- When it’s your turn to resolve Dark Fire III, do so outside.
- When it’s your turn to record:
- Short and Mid Fires do so just behind their hourglass.
- Long Fires do so in the center, just towards their hourglass.
- When your hourglass starts spinning, go bait the laser beam.
| A good trick to use when baiting your hourglass's laser is to position yourself such that the hourglass frame covers the black dot in the center of the "Spell-in-Waiting" icon above your character (when your camera faces towards the outside). | 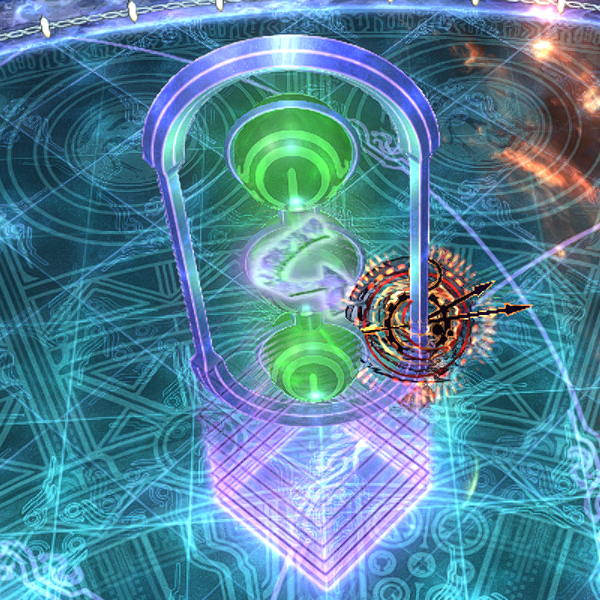 |
You can either refer to the macros above that dump the order of events in /echo chat, or just read off what you’re supposed to do next from the next debuff that’s expiring. Every 5 seconds, something happens (stack in mid if you don’t have a debuff that’s about to resolve, and your hourglass isn’t spinnning).
| 2. First set of Dark Fire III and Unholy Darkness resolve.
(This example illustrates the "slow Blizzard" case where a DPS has Dark Blizzard III.) | 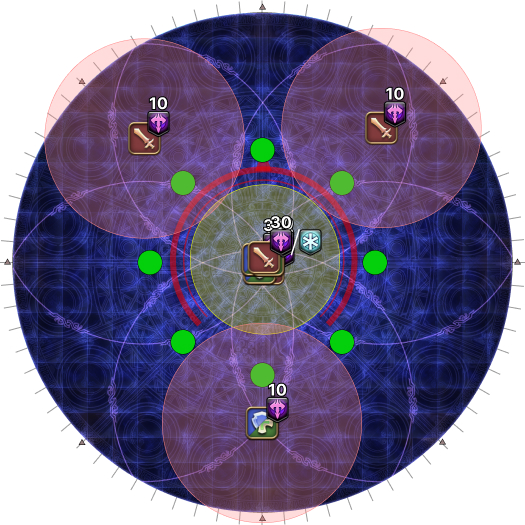 |
| 3. First set of records and laser baits.
| 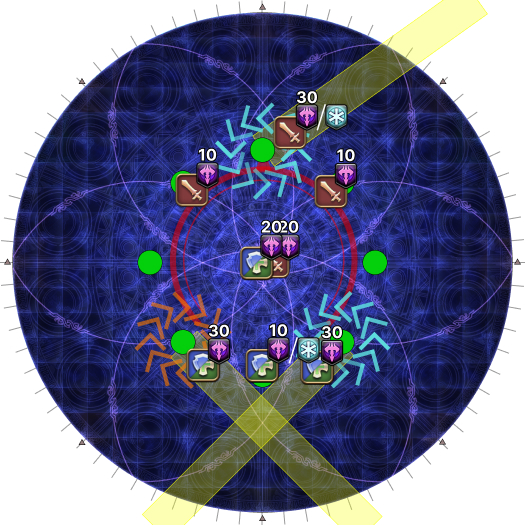 |
| 4. Second set of Dark Fire III and Unholy Darkness resolve. The Dark Blizzard III also resolves here.
| 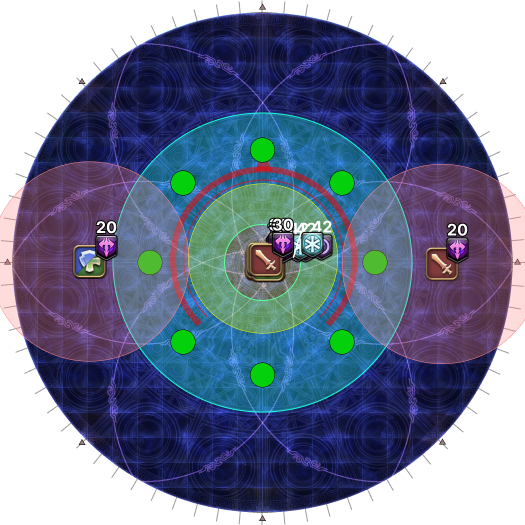 |
| 5. Second set of records and laser baits.
Record your position in your assigned clock spot position, a little away from the center. | 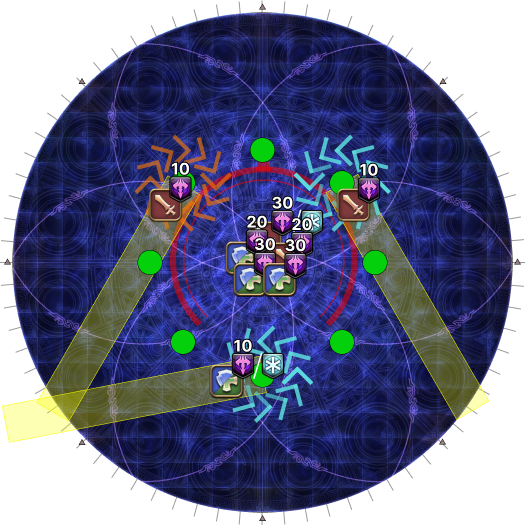 |
| 6. Third set of Dark Fire III and Unholy Darkness resolve.
(This example illustrates the "fast Blizzard" case where a T/H has Dark Blizzard III.) | 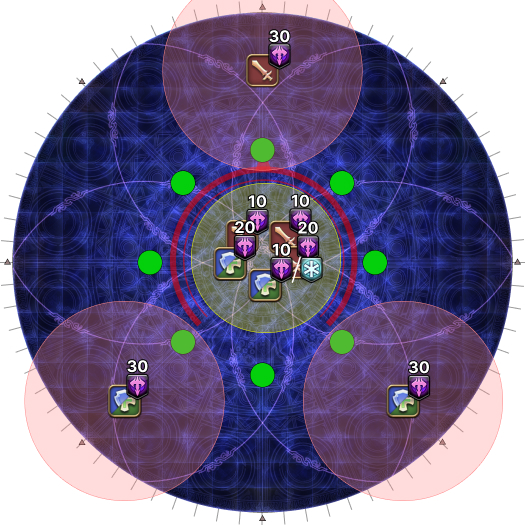 |
| 7. Third set of laser baits (there are no recordings).
|  |
| 8. The Rewind will trigger just before the 42s debuffs resolve. Note that your characters positions were recorded earlier, but not your orientation. Your character's orientation just before the Rewind will be locked throughout the Rewind. As a result, face your character towards the outside of the arena just before the Rewind resolves. (i.e: if you are at the NW position, face your character north-west.) | 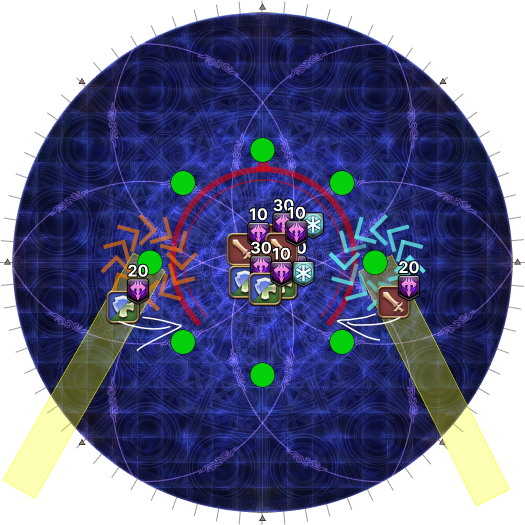 |
| 9. The Rewinds resolve, taking back your characters to their recorded positions, which should be along their assigned clock positions.
Done correctly, the Dark Eruptions should not hit anyone else, the Shadoweye players share the Dark Water III stack, and all players are facing outside to not get gazed by the Shadoweye attack. | 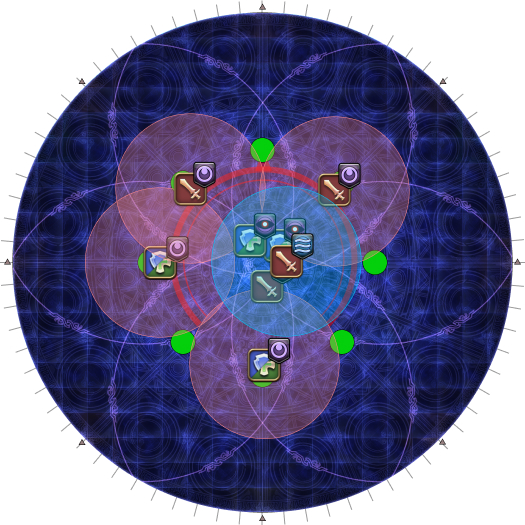 |
After you gain control of your characters, stack up in the middle to share a Shell Crusher AoE. The hourglasses will disappear, and the boss casts a raid-wide Shockwave Pulsar. The boss will then target the first player in aggro with Black Halo, a two-player tankbuster cleave.
Apocalypse(アポカリプス) - Permaswap, Coloured Apocalypse
The boss will be targetable for the duration of this mechanic.
Before the cast, the Oracle of Darkness first casts Spell-in-Waiting Refrain which puts three pairs of Dark Water III on six different players to be resolved during Apocalypse.
This effectively creates four pairs of players (including the two players who did not get any Water III).
We need to sort out the party into two groups of four, such that each group has one of each debuff (nothing, 10s, 29s, 38s).
This may necessitate one or two pairs swap around (depending on the number of duplicates).
This variant makes the party adjust just once at the start of the mechanic, and keeps the groups that way until the end.
However, in exchange, all players (other than H2 and D4) will need to be comfortable with dodging the Apocalypse AoEs from different positions. There is also a chance of melee downtime (although this can be mitigated by giving it to a tank).
| 10. Group up with tanks/healers NNW, and DPS SSE, and form a box. When Water III debuffs come out, look within your group for duplicates (nothing, 10s, 29s, 38s).
(In this example, H1 + H2 have the 10s Water, and D1 + D2 have no debuff, so H1 and D1 will be swapping sides.) | 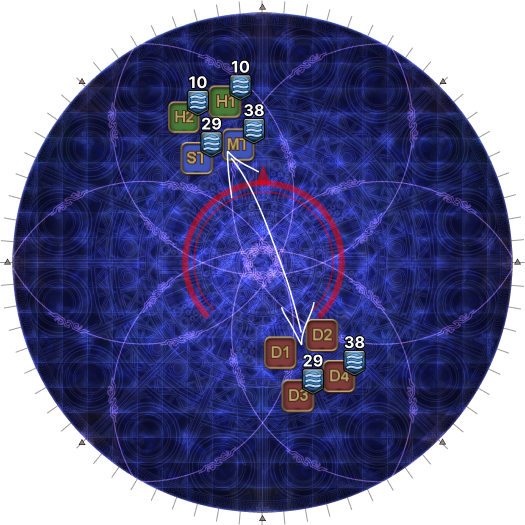 |
| 11. These will be your groups for the duration of this mechanic. Following the letter "Z", each group has their assigned position:
| 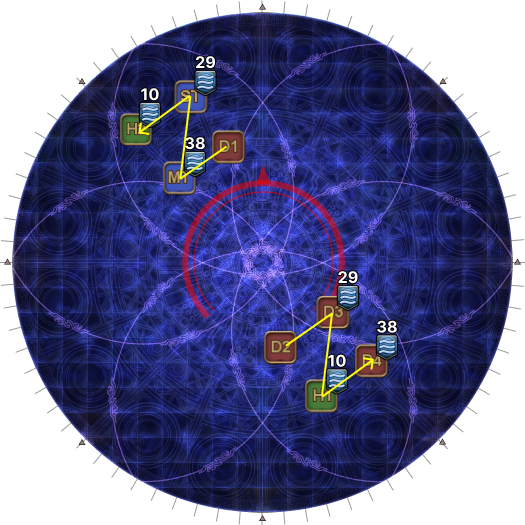 |
| 12. The Oracle of Darkness will cast Apocalypse, which changes the arena slightly, and the first pair of Dark Water III stacks resolve. Three points on the arena; one center and two opposite cardinal/ intercardinals will pulse white. This is a telegraph for where the later AoEs will appear. A white streak also originates from each point and follows the line around the arena clockwise or anti-clockwise. | 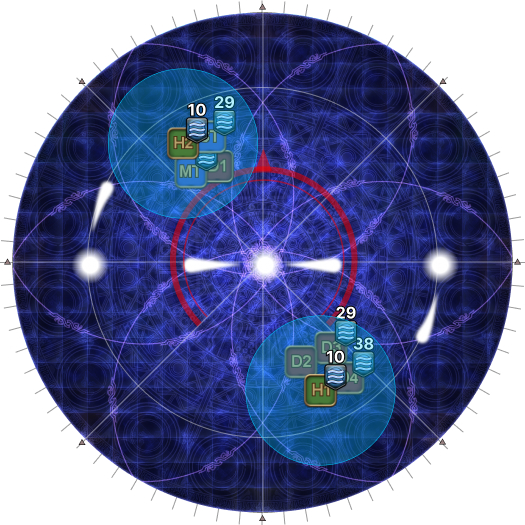 |
| 13. While the Water stacks are resolving, determine your future safe spots. Look at the outside lights- these will be each group's reference points in their half of the arena:
| 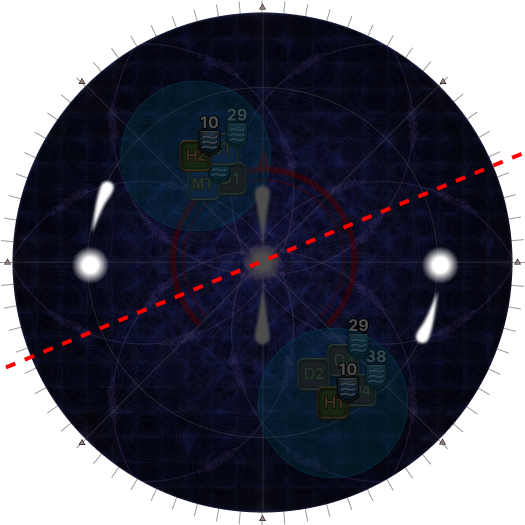 |
| 14. Then, from your assigned outside lights, look 45 degrees in the opposite direction that the lights are travelling in. From these reference points, there are four more positions to take note of (marked with yellow arrows):
These will be your spread positions later. (In this example, the lights start W and E and go clockwise, so the "base T/H" group references W, and the "base DPS" group references E. Rotating 45 degrees in the opposite direction means the "base T/H" group goes SW, and the "base DPS" group goes NE.) | 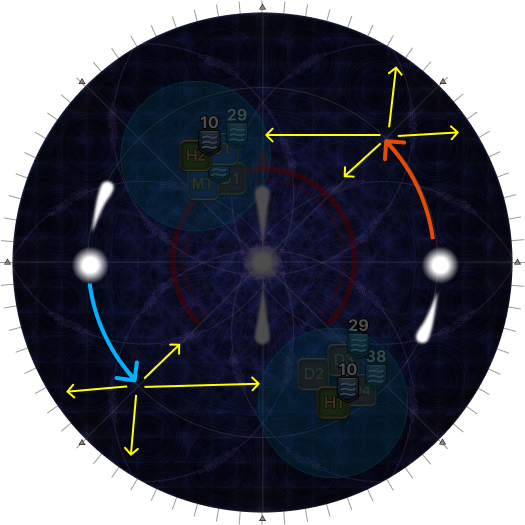 |
| 15. While the water stacks were resolving, the boss also readies Spirit Taker- the boss will jump on a random target with an AoE attack that knocks anyone else hit out of the arena. After the water stacks resolve, quickly spread out for Spirit Taker in the earlier box formation. | 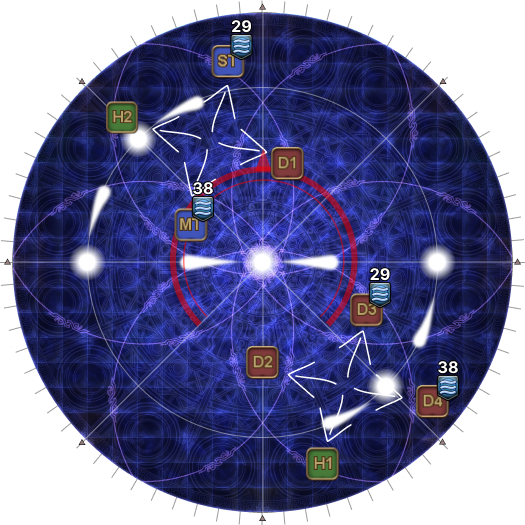 |
| 16. The boss's Spirit Taker resolves. | 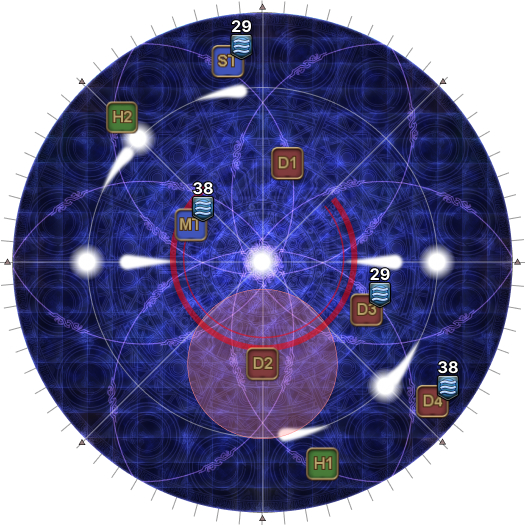 |
| 17. The boss will return to the center. The trails will continue for a total of six pulses (indicating six upcoming sets of AoEs) and end up in this formation relative to the first set of pulses. All party members will get a spread marker. Just like before, spread out in your previous box formation. | 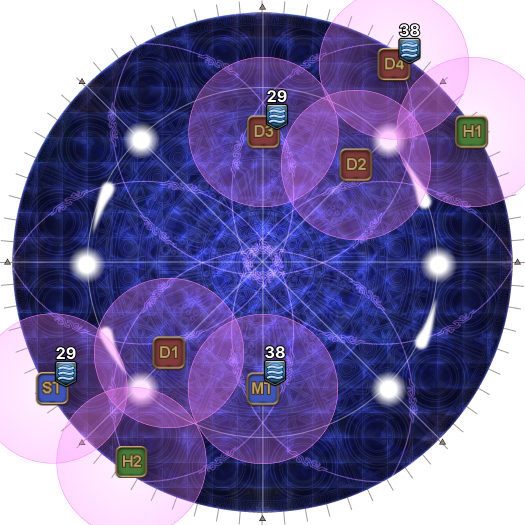 |
| 18. The AoEs now resolve for real. The AoEs will appear at the points that pulsed earlier for a total of six waves. | 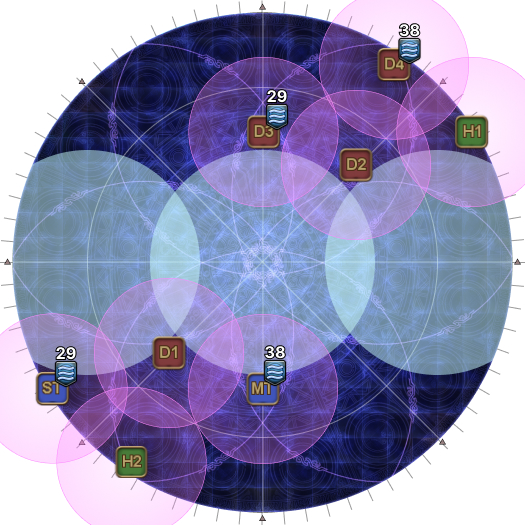 |
| 19. The second set of AoEs resolve together with the party's spread markers. Move as soon as the spread AoEs resolve. | 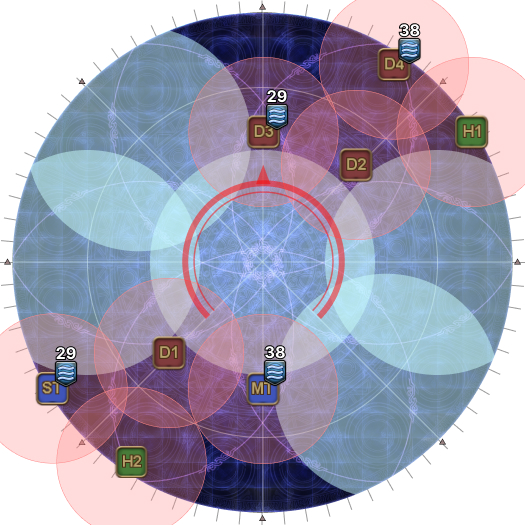 |
| 20. Quickly move to the center while avoiding the third set of AoEs.
| 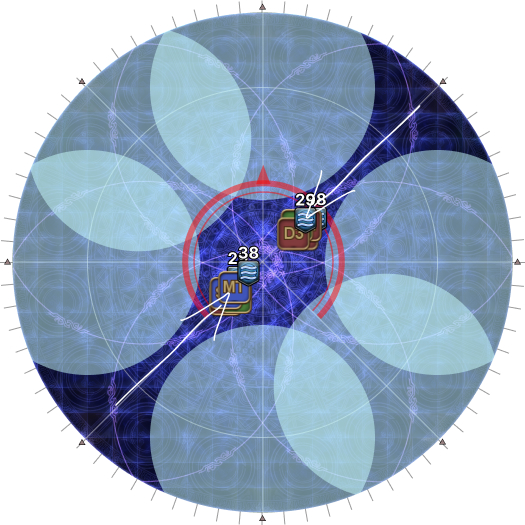 |
| 21. Fourth set of AoEs. Use this time to gauge how far you can be from the center and still avoid getting hit. | 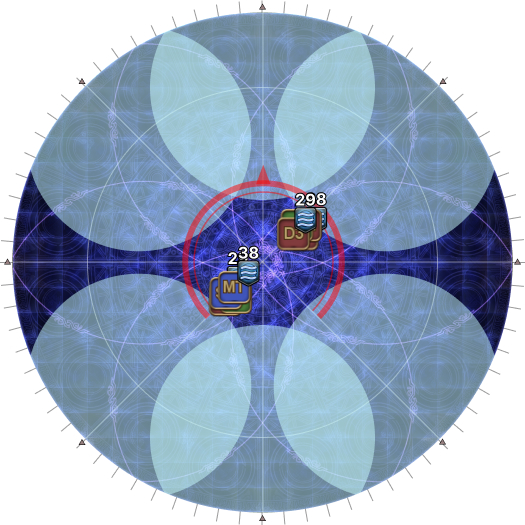 |
| 22. The second set of Dark Water III stacks resolve together with the fifth set of AoEs. The ST moves out 90 degrees from where the first set of lights pulsed. | 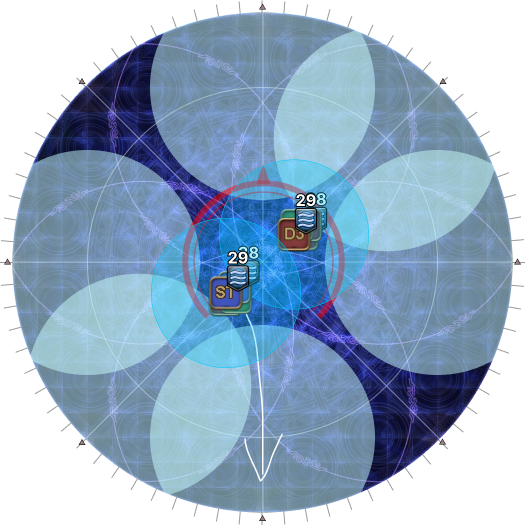 |
| 23. The boss then uses Darkest Dance, which targets the furthest player (which should be a tank) with an AoE tankbuster. Note: Either tank can bait this. | 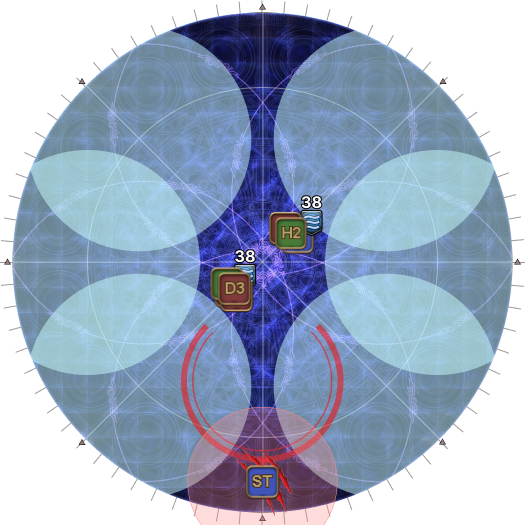 |
| 24. The tank that baited Darkest Dance rejoins their group. Everyone moves towards the boss, and positions to prepare from a knockback from the boss in their groups.
| 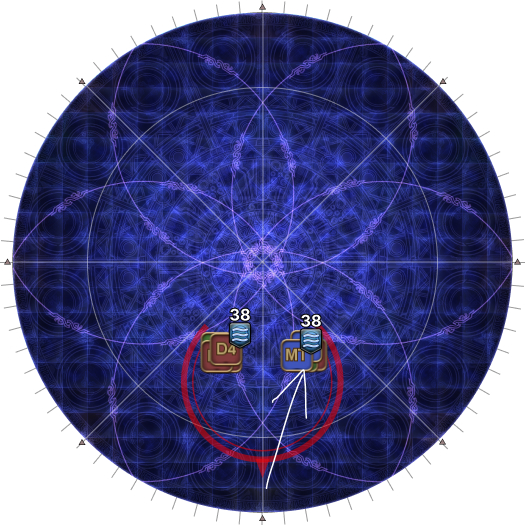 |
| 25. The boss does a knockback. | 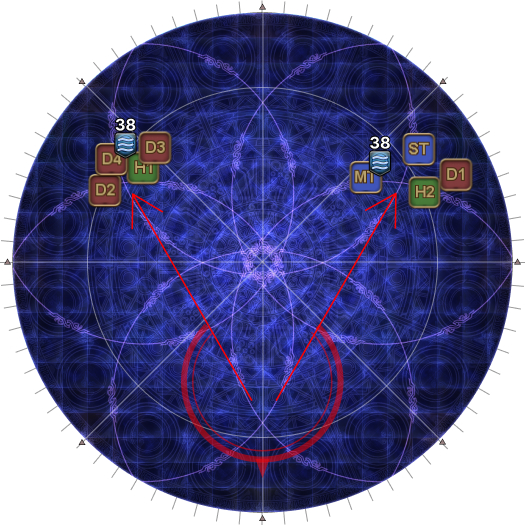 |
| 26. The third set of Dark Water III stacks resolve. Resolve these near the boss- melee can use their gap closers, but will need to back out a little bit to meet up with the healers and ranged. | 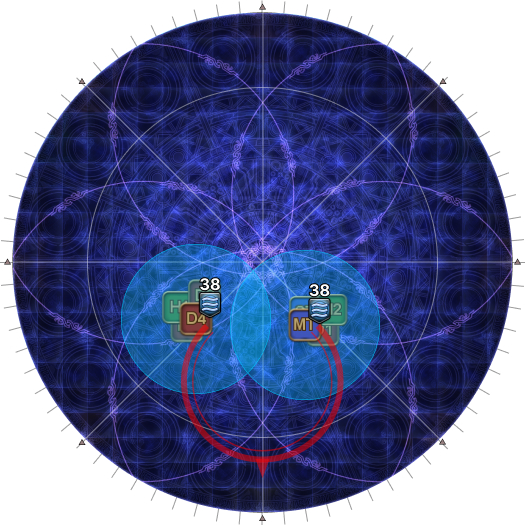 |
The boss ends this sequence with another Shockwave Pulsar before casting Memory’s End for the enrage. Like the previous phase, the Oracle of Darkness must be brought down to under 20.0% HP to advance.
Frequently Asked Questions
[Debuffs] What is the difference between Dark Water III and Unholy Darkness? Aren't they both stacks?
| Dark Water III and Unholy Darkness are both stacks with one crucial difference:
|   |
[Apocalypse] Are there cases where more than one pair needs to swap?
| Yes. It's rare (3/35 chance), but certainly possible. Consider the following example:
The T/H and DPS groups each have two duplicate debuffs, so we will have four players swapping groups (MT, H1, D1, D2). Most of the time, one pair will need to swap (24/35 chance). The probability that nobody has to swap is 8/35. |
[Darkest Dance] How do tank invulns here interact with the rest of the fight?
| Some important relations to keep in mind are:
However, PLD is the only tank that cannot invuln Somber Dance in P4 and have it available for either Wings Dark and Light in the final phase, so prioritize letting PLD bait Darkest Dance with Hallowed Ground in this phase to extract the most out of your tank invulns. |
Troubleshooting
[Hell's Judgment] Isn't this supposed to set your HP to 1? How did I die?
| You had an effect that increased your maximum HP that wore off. Examples include:
|