Fatebreaker(フェイトブレイカ)
Cyclonic Break
Fatebreaker opens with Cyclonic Break, which is a mechanic that reappears shortly in the middle of Utopian Sky.
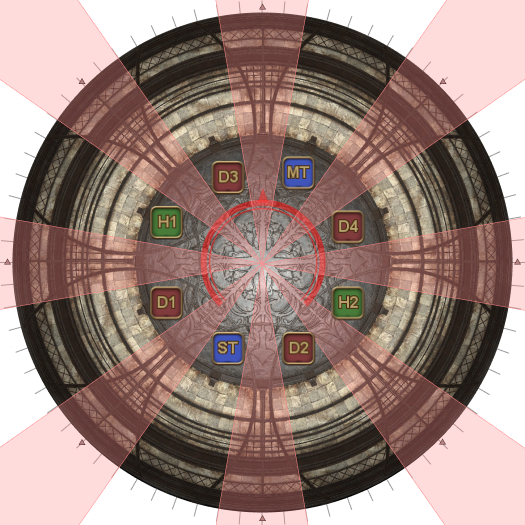
| 1. Take up your spread positions around the boss. The boss will have either a red or blue dragon swirling around him. Pay attention to the colour because it will affect how the next steps are resolved. | 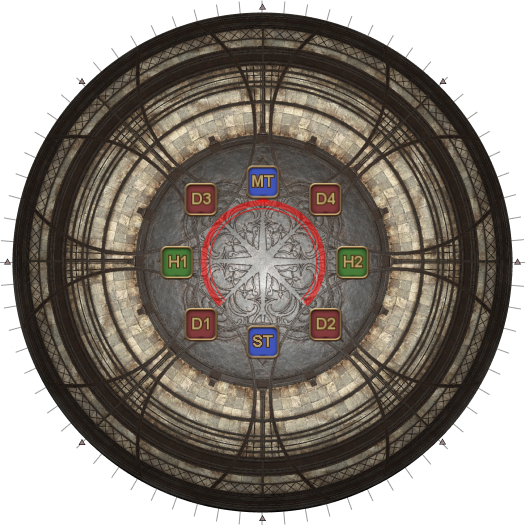 |
| 2. The boss cleaves where each player is standing. | 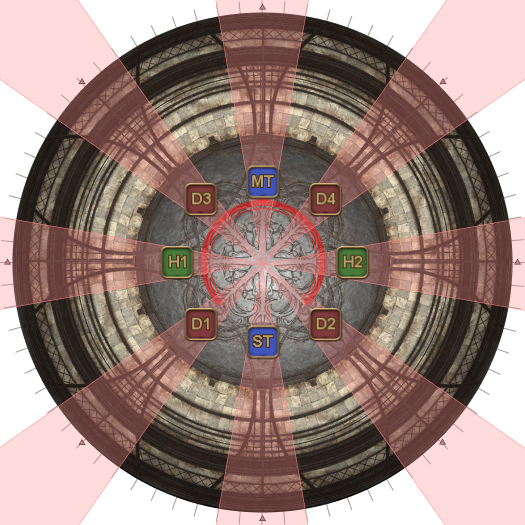 |
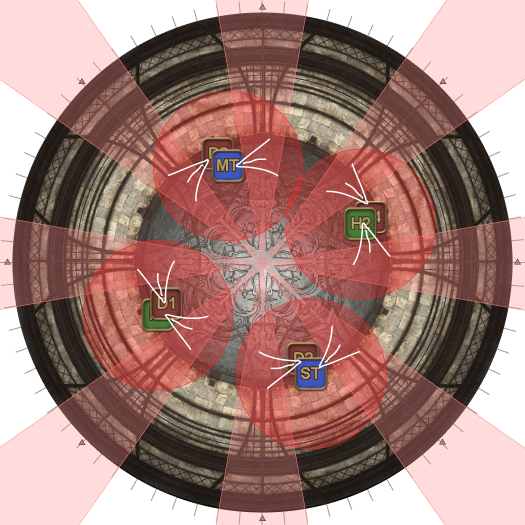
| 3. The boss will cleave again where the players were standing. Dodge to avoid this second set of cleaves, however, the party will need to simultaneously resolve either a party spread (if the boss had a blue dragon), or pair-stacks (if the boss had a red dragon). | |
| Boss glowed blue | Boss glowed red |
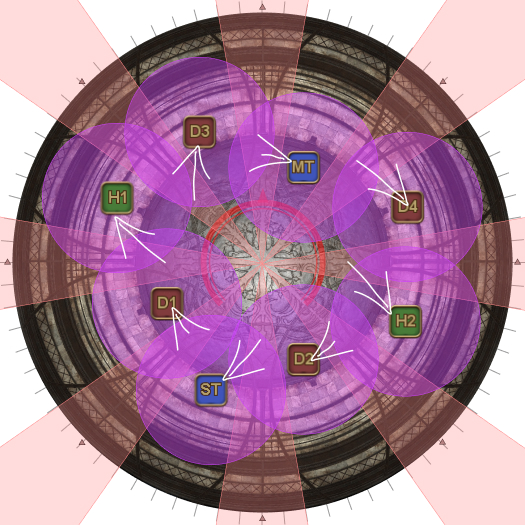
| 
|
| 4. Each successive cleave is baited at each player's position during the previous cleave, so just alternate positions to dodge the last two sets of cleaves. | 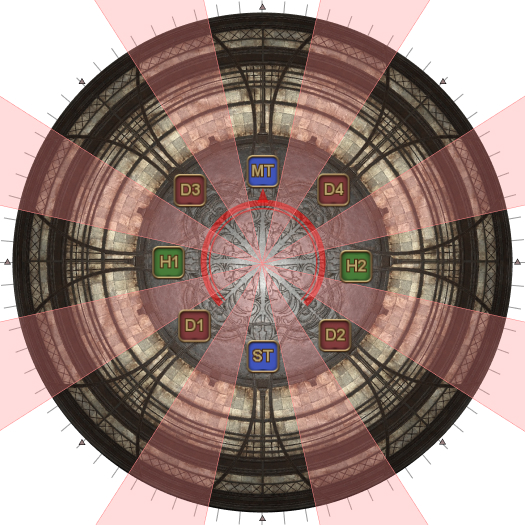 |
| 5. On the fourth cleave, the boss will begin target the MT with Powder Mark Trail. This is a single-target tankbuster that applies a Physical Vulnerability Up and a Powder Mark Trail debuff.
|  |
 | Powder Mark Trail Emblazoned with a gunpowder mark that will cause you and the nearest ally to explode when this effect expires.
|
Utopian Sky
The boss will then cast Utopian Sky and glow either red or blue. Pay attention to this colour.
| 6. Take up these modified spread positions for Utopian Sky. Note that the ST and D4 have swapped positions.
There will be eight clones around the arena at the (inter)cardinal positions, but only visible to players nearby. | 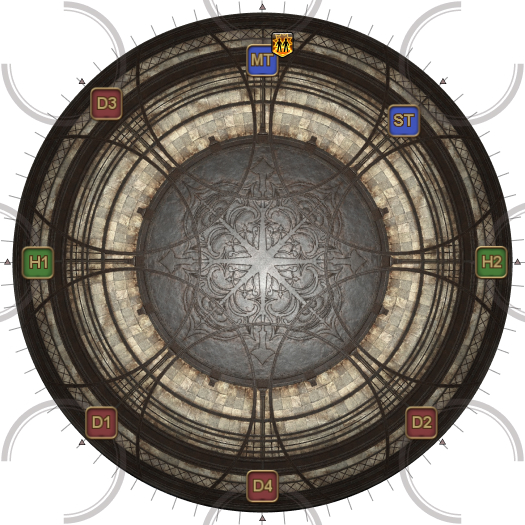 |
| 7. The MT's Powder Mark Trail resolves, hitting both the MT and the ST with a large AoE tankbuster. At this time, three clones will raise their gunblade (indicated by the red targets) to fire a straight line AoE down the middle, leaving two opposite sectors safe. |  |
| 8. Because only the player next to a clone can see whether that clone has raised their gunblade or not, the party needs to collectively deduce which sectors are safe.
(In this example, the clones by ST, H1, and D4 raised their gunblades.) | 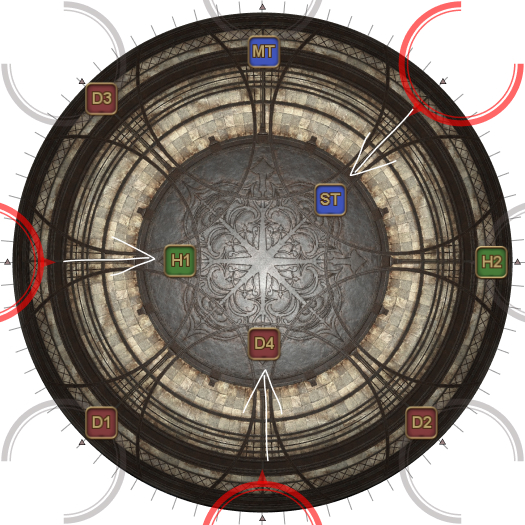 |
| 9. Since the players that moved in have their clone's gunblades raised, those players are in the unsafe line of fire.
Six players should now be in the middle of the arena. The two remaining players on the outside are the safe sectors (these will always be opposite each other). (In this example, because ST, H1, and D4 moved in, the MT, D1, and H2 who are opposite move in. The sectors with D2 and D3 are safe.) | 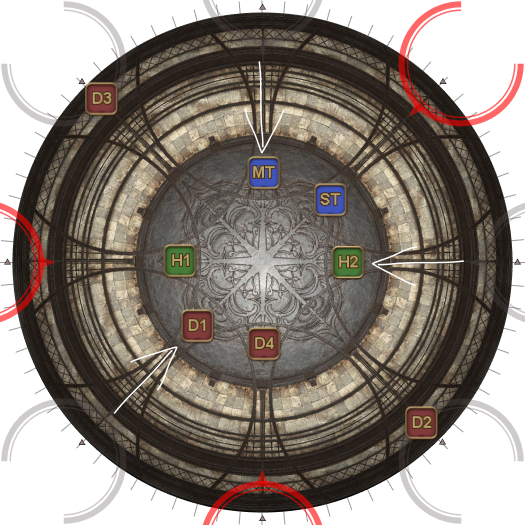 |
| 10. Move to your assigned safe sector, and either spread out as shown (if the boss glowed blue earlier), or stack together (if the boss glowed red).
(If spreading, the DPS should be 3.5 tick marks away from the tanks.) | 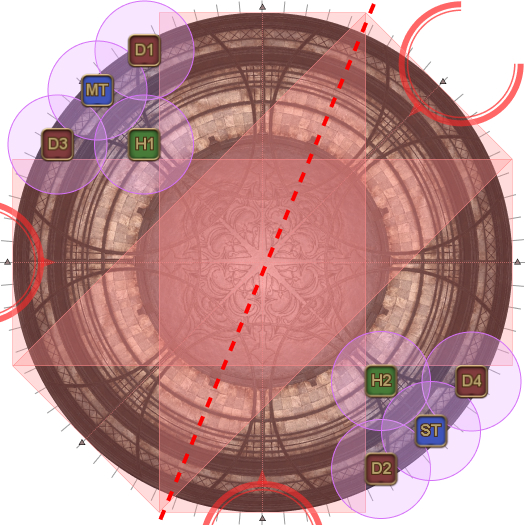 |
| 11. The boss will reappear (untargetable) in the center and glow either blue or red for another Cyclonic Break. Return to your original Cyclonic Break spread positions, and resolve this the same way as at the start of the encounter. As the first set of cleaves go off, another clone appears North and will glow either red or blue. Pay attention to this clone's colour. | 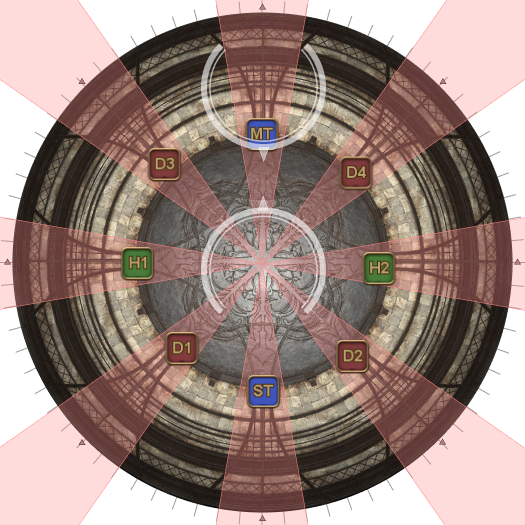 |
| 12. Red and blue circles will appear on the arena. These will all resolve with an AoE, but the one with the same colour as what the North clone glowed will have larger AoEs. A clone spawns and does a Burnt Strike (Lightning) from east-to-west. In addition, two random players will get targeted with a Prey marker and a Fated Burn Mark debuff (this will wipe the party if the player dies.). | 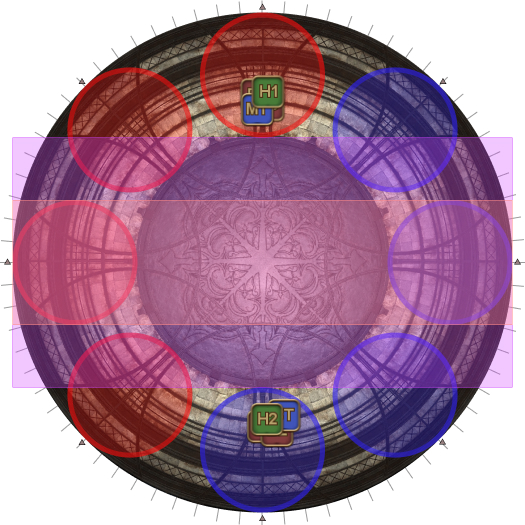 |
| 13. The party needs to split into two groups of four, with a Prey marker in each group:
Because the Prey targets are random, there may be a need to adjust, based on how many Prey markers are in your group:
Stack together in your north/south groups and wait for a clone to do a second Burnt Strike (Fire) from north-to-south. Move in after the initial hit to get knocked back towards the edge. (This cannot be nullified by anti-knockback abilities) | 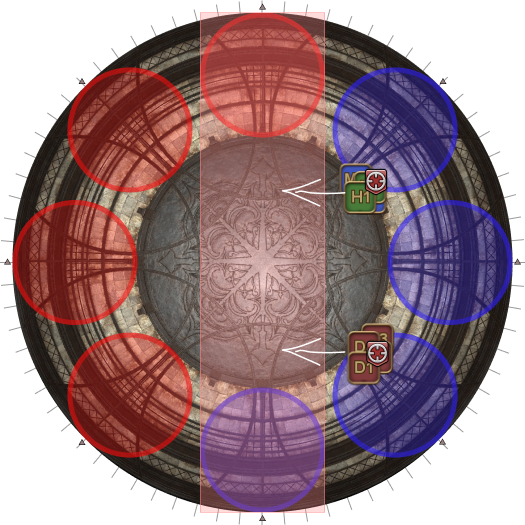 |
| 14. The circle AoEs now resolve. The circles that matched the earlier colour (red in this example) will have larger AoEs. | 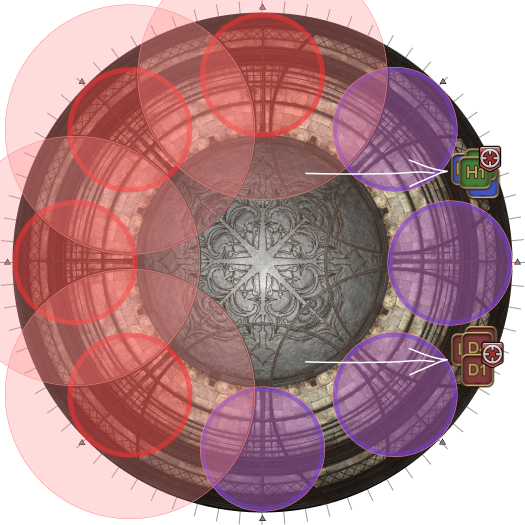 |
| 15. Finally, the two Prey targets will resolve their stacks. | 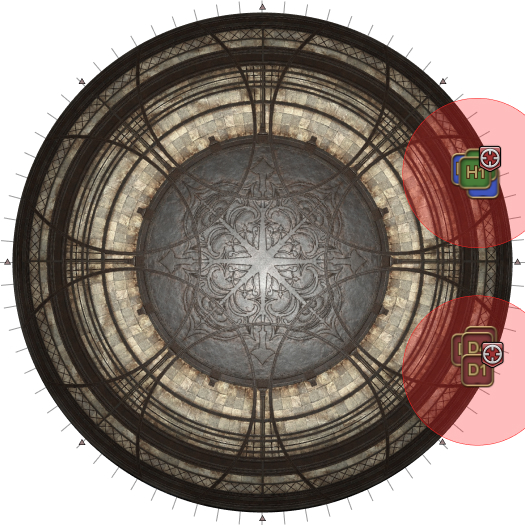 |
The boss will return to the arena with Burnished Glory, a heavy-hitting raid-wide that also applies a DoT on the party.
Shortly after, the boss then prepares the second mechanic combo.
Fall of Faith(シンソイルセヴァー)
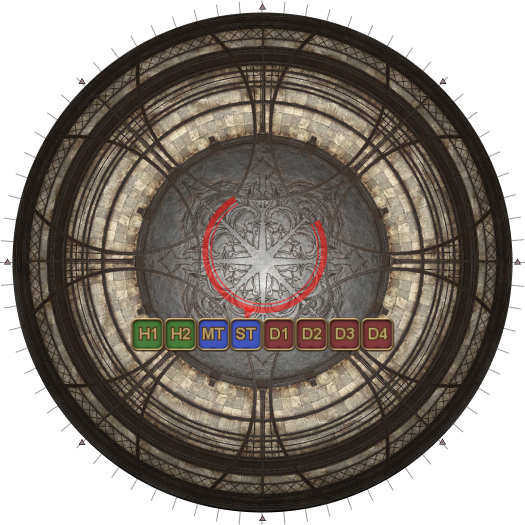
This is resolved with a “West-to-East” conga line to help sort out priorities.
| 16. Line up from West to East, on the South side of the boss:
|  |
| 17. The boss will glow either red or blue again, and tether to a random player. The tether will also be tinted blue or red.
(In this example, the boss and tether glow blue.) | 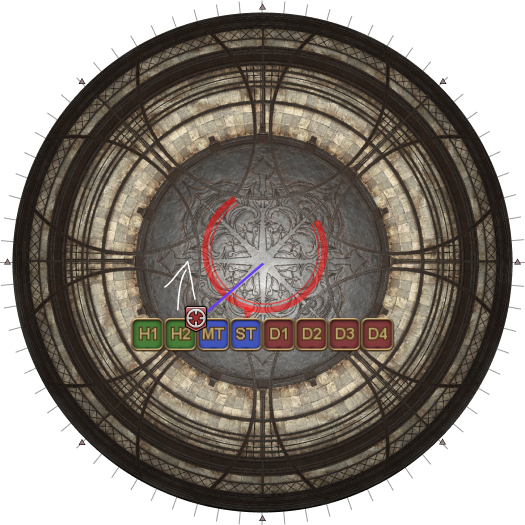 |
| 18. A clone will appear North-West, glow red or blue, and tether to a random player. The tether will also be tinted blue or red.
(In this example, the clone and tether glow blue.) | 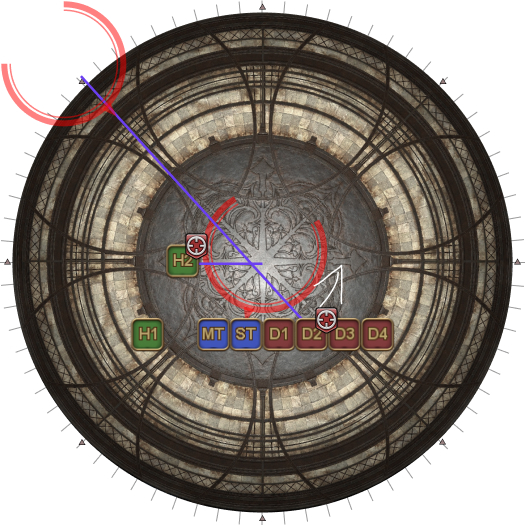 |
| 19. Another clone will appear North, glow red or blue, and tether to a random player. The tether will also be tinted blue or red.
(In this example, the clone and tether glow red.) | 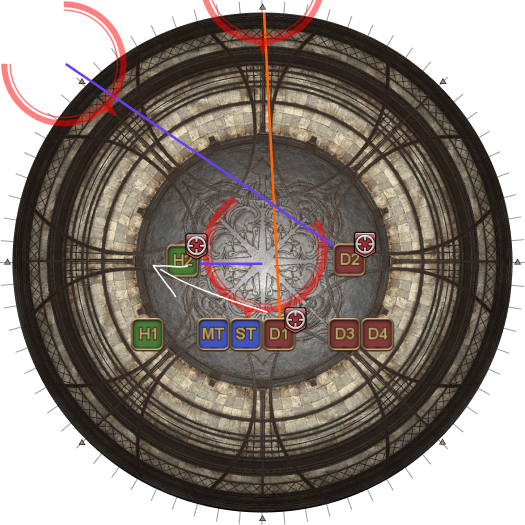 |
| 20. One last clone will appear North-East, glow red or blue, and tether to a random player. The tether will also be tinted blue or red.
(In this example, the clone and tether glow red.) | 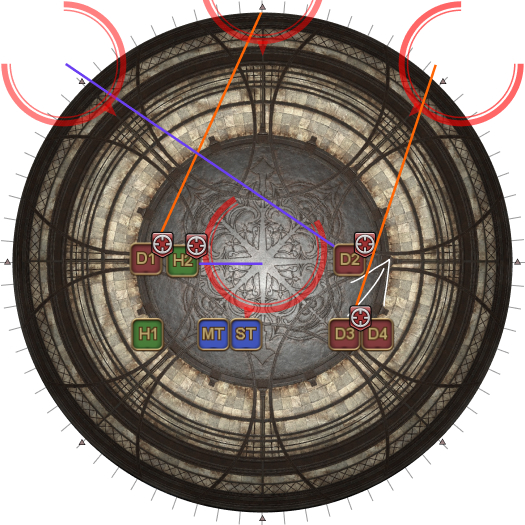 |
| 21. With four people tethered, this leaves behind four players that were not tethered. We need to split the four untethered players so that the North and South groups each have four players.
If the tether is Lightning, then use the following priority to decide who goes North, and who goes South:
| 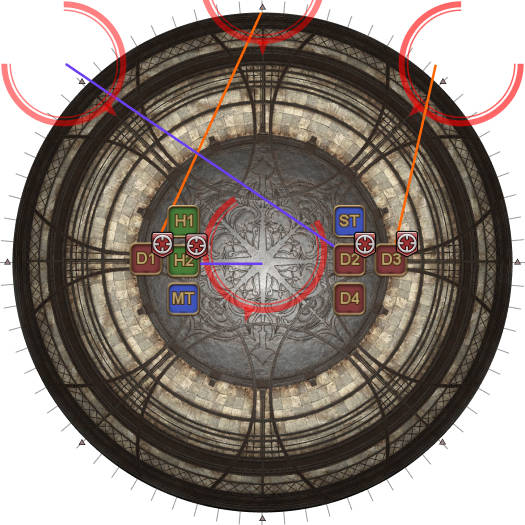 |
| 23. We resolve the first of four tethers. Lightning tethers fire cleaves at the three closest players. The other three players must spread North, South, and West of the tethered player (who will be immobilised). (In this example, we resolve a Lightning tether.) After this resolves, the first and third tethers swap positions. | 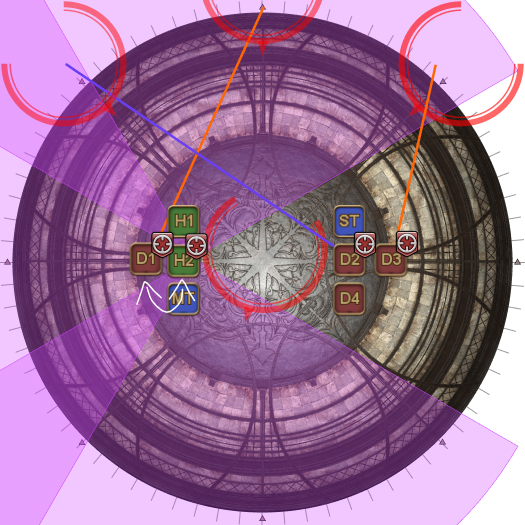 |
| 24. We resolve the second tether. (In this example, we resolve a Lightning tether.) After this resolves, the second and fourth tethers swap positions. | 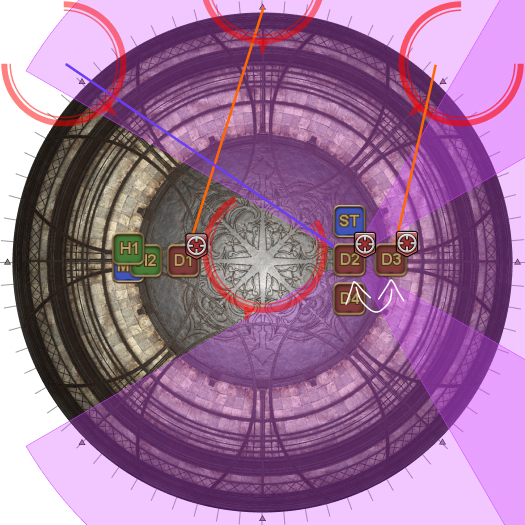 |
| 25. We resolve the third tether. Fire tethers cleaves the closest player, that is shared between the three players. All players stack together West/East (towards the outer edge) of the tethered player (who will be immobilised). (In this example, we resolve a Fire tether.) | 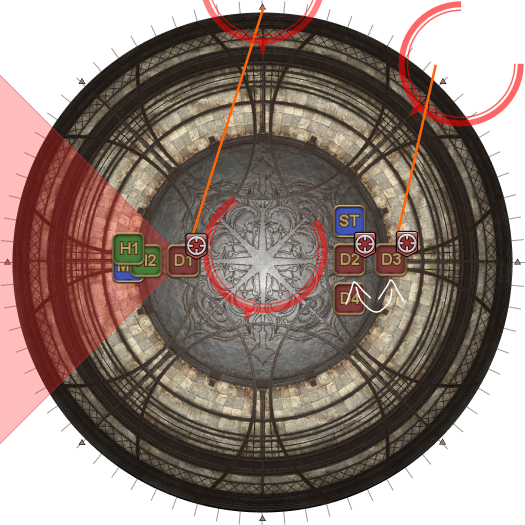 |
| 26. Finally, we resolve the fourth (and final) tether. (In this example, we resolve a Fire tether.) | 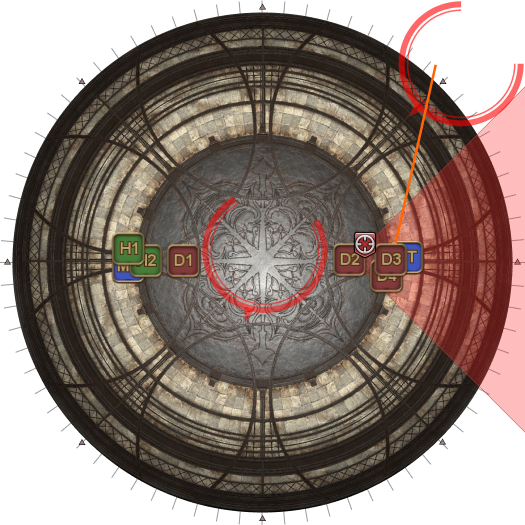 |
The boss then does another Burnished Glory, followed by a Powder Mark Trail (which should target the ST). This Powder Mark Trail should be invulned.
Towers
This is the last mechanic of the phase.
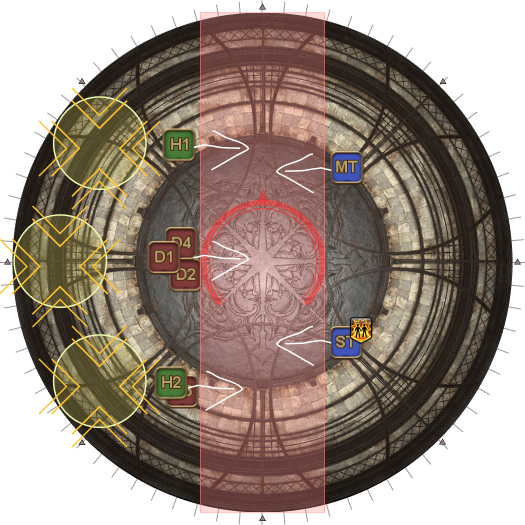
| 27. Three towers will spawn along either the West or East edge. There will be six pips divided randomly amongst the three towers. To resolve this, we fix the three casters:
| 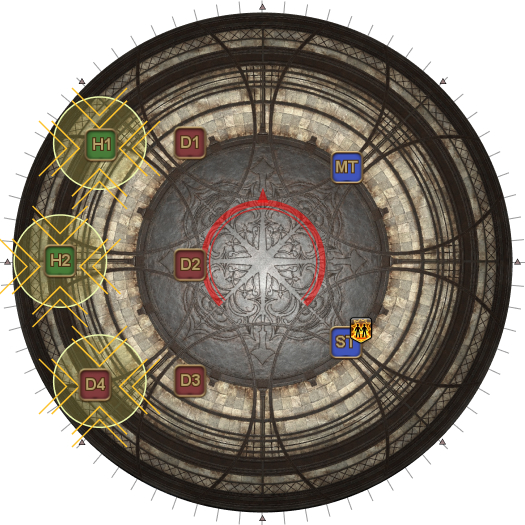 |
| 28. The three unassigned DPS (D1, D2, and D3) fill in the missing tower pips as needed.
(In this example, the North tower has one pip, the middle tower has three pips, and the South tower has two pips, so D1 and D2 will go to the middle tower, and D3 goes to the South tower.) | 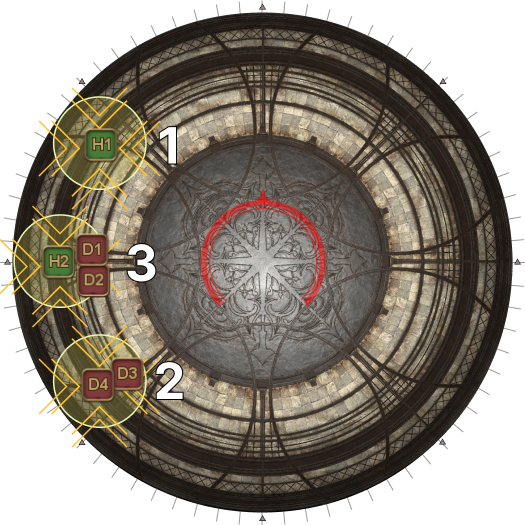 |
| 29. The boss will glow either red or blue and prepare Burnt Strike. Either go straight to your tower (if the boss is blue), or prepare to move in to get knocked back into the towers (if the boss is red). | |
| Boss glowed blue | Boss glowed red |
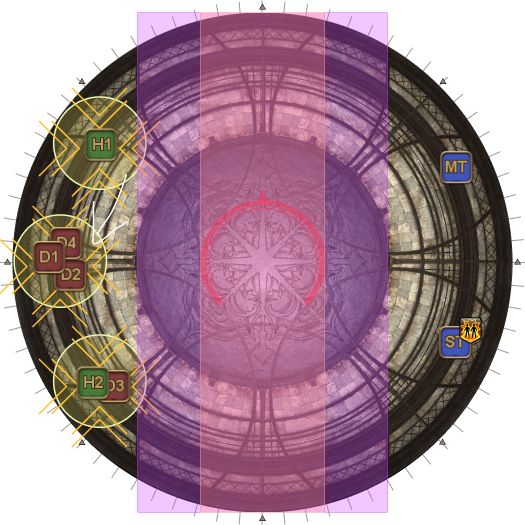 |  |
| 30. The ST's Powder Mark Trail resolves, followed by the towers. | 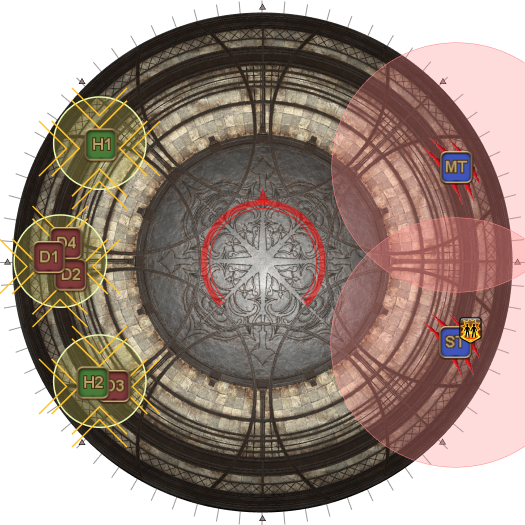 |
After this, the boss begins to cast a Burnished Glory as the hard enrage for the phase.
Frequently Asked Questions
[General] How should I burst in this phase? Utopian Sky screws up everything!
| Use your 1-minute abilities right after Utopian Sky. Your 2-minute abilities should come up at the conclusion of Fall of Faith- use them on cooldown without the 1-minute abilities. Save the 1-minute abilities for the next phase's opener. You will want to hold damage and kill the boss towards the end of the enrage cast. This will synchronise your 2-minute abilities with the start of the crystals phase at the end of P2, making its check significantly easier. |
[Utopian Sky] Why shouldn't you jump if your sector is safe?
| When the party is spread out, everybody is looking for movement as an indicator that "this sector is not safe", since one of the conditions is that if the player opposite you moves, then your sector is not safe either. As a result, if you jump up and down to try and indicate that your sector is safe, it will likely get misinterpreted as "this sector is unsafe" instead. Thus, if your sector is safe, stand still and do not move. |